Friday, October 28, 2016

CREATION OF ITEM


CREATION OF ITEM

Process that how to Create an Item:
Creating an Item: As the first step in creating the item go to the Inventory responsibility and in that master items screen. The navigation is Items ->Master Items. The given below is the Master items window.
 Note: Before you got the master items screen you will ask for the choose organization screen then you get this screen. Here we choose the “V1” so, the items was set to V1 by default as the master organization. If we want we can assign this item to any other child organizations see the process in the coming steps.
Slide72
Enter all the fields like item, description, Long Description such fields as per the requirement. After go to the Tools menu and in that go with Copy From option in that as we shown in the below figure. Then we get the Copy from window.
Slide73
Slide74
Enter the Template name from the list which we want to assign to the current item BAGS and go with the Apply after that Done. Then the template was copied to the current item. Then go with the Organization Assignment option as we round in the given below figure then the view of the window will be changed as below.
Slide75
Assign the item to the child organizations what ever you want. Then go with the save button then the item was created successfully. Now we have to set the price list for the item then only we can view the item in the sales order like that. Now go with the
Order Management responsibility. The navigation for the price list setup is Pricing ->Price Lists ->Price List Setup. Then you get the Advanced Pricing window.
Note: There are different price lists “Corporate” is default when we are creating the sales order so, we are adding our item to the “Corporate” price list. If we want we can create new price list as per the requirements. After getting the Pricelist window then go with F11 query mode gets the price list what ever you want and add the item and enter all the mandatory fields such as Product Context, Product Attribute, Product Value(Item Name), price, to it after that go with save button. Then the item was successfully added to the price list.
Slide76
Enter all the details correctly before saving. Here in the form the rate of the item is described as value in that field we have to enter the rate of the item.
Slide77
Now at this stage the item was created and added to the price list was successful but the on hand quantity of the particular item is ZERO (0). That means we can’t book the orders on that item. To increase the on hand quantity of any particular item is given below. We have to go with the Inventory responsibility and the navigation is Transactions Miscellaneous Transaction. Then you will ask for the organization then select the child organization which we have selected for the item created above. Then we get the window as below.
Slide78
Enter the mandatory fields and then go with the transaction lines. Then we get the window given below. Enter the item name, sub inventory, Amount and quantity as per the requirement. Here we entered 120 as ex.
Slide79
When we enter the tab position to the amount then we get the Operations Accounting window given below. Select the appropriate option from the list of options. Here we selected the Cash as per our Ex.
Slide80
After entering the amount field then go with the save button. Then the items quantity will be increased. Now we can go with the orders now.
To check the on-hand-quantity of any item we have to go with the Inventory responsibility and the navigation is On-Hand, Availability On-Hand Quantity. Then we get the Query Material window we have to enter the item name which we want to check the quantity and go with the find button below the screen.
Slide81
After that we get other window in that we get the details of the item on-hand and other.
Slide82
Here there is the Availability button when we go with that we get the same details in
the short window.

Order Management in Oracle Applications


Order Management in Oracle Applications

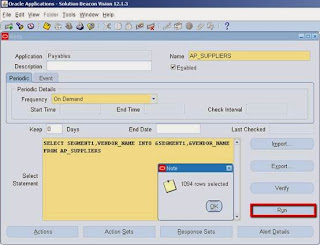
Booking Order: Go with the Navigation to open sales order window Orders, Returns Sales->Orders. Then we will get the Sales Order – (NEW) Form as shown below.
Slide44
Note: When we open the sales order form the order is created and the status of the order is in Entered state after that we update the order only. Don’t think that the order is created when we click on the Book Order button.
Enter the customer name which exists in the database here we take CDS, INC as example. In this form there are two mandatory fields those are bolded in the figureabove. Here when we click save then we will get the Order_Number By moving to the Line-items tab we will get another view of the screen given below.
Slide45
Now enter the Ordered Item and Quantity. To check weather the Ordered_item is existing then go with Availability button. if we book the order with out the availability of item then the backorder will be created automatically. The Availability window is shown below.
Slide46
In this window the ATP Details button is Available To Promise that means how many items can we give to the customer and Global Availability button is used for check weather there is availability of the item in any other ware house or not. By clicking on the Global Availability button we will get this dialog box.
Slide47
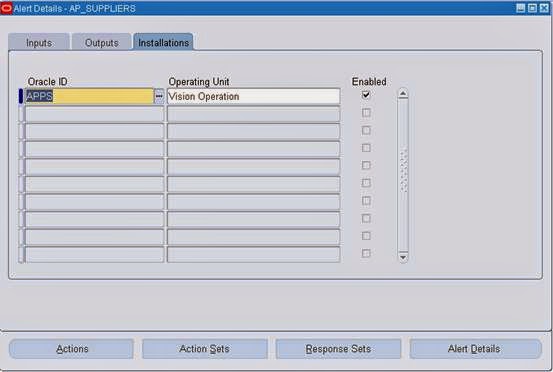
Here in this stage two tables will get affected. The complete header information will store in the OE_ORDER_HEADERS_ALL and line information will store in the OE_ORDER_LINES_ALL now the status of the line is awaiting shipping.Then go with Book Order button to book the Order then the status of your order is changed to BOOKED from the ENTERED state here WSH_DELIVERY_DETAILS table will be affected. Copy the Order_Number then close the Sales Order Form. Now go with navigation to pick Release the order.
Shipping Release Sales Orders Release Sales Orders Then we will get another window “Release Sales Orders for Picking “\
Slide48
Enter the Order Number which we created in the Sales Order form above and go with online button. Then we will get the message that Online completed successfully. Then go with the navigation. Here the status is in pick release the tables affected are
MTL_RESERVATIONS and MTL_ONHAND_QUANTITIES.Shipping ->Transactions 
Then we will get the Query Manager form shown below in the form enter the Order Numbers fields.
Slide49
Then go with the find button we will get now Shipping Transactions Form as shown below.
Slide50
Go with Delivery tab and change the Actions to Ship Confirm and go with Go(B) Button then other dialog box will open.
Slide51
Now a document set will run to view the result go with view Requests. Here fiveprograms will run those are Interface Trip Stop, Commercial Invoice, Packing Slip Report, Bill of Lading, Pick Slip Report. These all programs must be completed normal other wise our order go wrong.
Slide52
Creating Invoice: To create the invoice after all the five programs completed normal we have to run manually a request named “Workflow Background Process”.
Slide53
After we submit the request Workflow Background Process then “Auto Invoice Import Program” will run automatically and the Invoice will generate based on the reference of the Order_Number. Here RA_CUSTOMER_TRX_ALL and RA_CUSTOMER_TRX_LINES_ALL will get affected.
Slide54
After the auto invoice program status come to completed normal then go with the following navigation to view the invoice.
      Receivables-> Transactions ->Transactions
Then we will get the Transactions(Vision Operations) Form as shown below. By this window we can retrieve the Invoice Number. Press F11 by enters into the query mode we have to enter the Order number in the Reference field. Press ctrl+F11 to retrieve the invoice number.
Slide55
To view the balance of the customer goes with balances button according to the requirements. The given below is the balances screen where the customer payment details are in this window. Based on the amount He pay we made a receipt for him. Here according to the below form the customer has to pay 100,000 we are making receipt forthat amount only if he pay.
Slide56
Making Receipts: After taking amount from the customer, we have to make a receipt. Copy the Invoice number and close the Transactions form. Now go with the following navigation.
 Receivables-> Receipts->Receipts
Then we get a Receipts form. Enter the Invoice number at the Receipt number field and Trans number which we round in the below figure observe that because based on the invoice number only we have to raise the receipt to the customer.
Slide57
After entering all the mandatory fields in the form then go with Applications button. Then we get Application window just save it then your receipt is generated based on the Invoice Number.
Slide58
Here in the Applications form there Chargebacks and Adjustments buttons. If there any Adjustments of any reductions in the amount then we go with Adjustments button.
Transfer to General Ledger:
Run the request General Ledger Transfer Program to create a general in GL and also to post it. The navigation for this is Interfaces -> General Ledger in the Receivable Responsibility.
Slide59
Then it will ask for the Request, enter the request name as General Ledger Transfer Program then it will ask for the parameters the given below screen will appear. The mandatory parameters for this request are GL Posted Date and Post in Summary.
Slide60
By clicking on the OK button then the request will be submitted then go for menu view requests to view the status of the request which we submitted then the current created receipt will be submitted to the GL successfully.
Returning Order: Enter the company name and other details same like booking the order as we mentioned above. There is a change in the Line items tab. Change the line type as Return Receipt because we taking returns from the customer.
Slide61
Now go with Returns tab in the Line Items tab. The Returns view is shown below. Here the Return Reason is the mandatory column on what purpose they are returning the goods we have to enter here we take Damaged goods. Now go to the reference field here rounded in the figure.
Slide62
Then another dialog box will open given below. Enter the field’s reference type as Customer PO or Invoice or Sales Order or Serial number. Here we take Customer PO as reference we have to enter the Customer PO when we book the sales order. At the same
time when we choose the reference as Invoice or any other options we mentioned above also the same process.
Slide63
By Pressing ok here and click on the Book Order button then the Return order is booked successfully message will be displayed.
Now go with the navigation Purchasing ->Receiving ->Receipts then we will ask for the choose the Organization here we will select M1 as we are working with M1 organization.
Then another window Find Expected Receipts(M1) will open given below. Go to the Customer tab enter the order number which we create there for the sales return order. After entering the RMA Num (Return Order Number).
Slide64
Go with the find button then another window Receipts(M1) will open. Check the rounded check box and enter the mandatory field Sub inventory and other if necessary then go with save button then automatically the receipt number will be generated.
Slide65
Click on the Header button then receipt header form will be open. Now the receipt number is generated then close the form.
Slide66
When the Receipt was generated then two Requests will run in the background automatically they are shown below in the Request window.
Slide67
Order to Cash Flow with Order Management and Process Inventory:
Entering and managing orders is performed in Order Management. Shipping Execution allows you to plan and confirm your shipments. Inventory to satisfy your order requirements is allocated and picked in Process Inventory.
The following diagram illustrates the components of the Order Management for Process flow and is described in the following steps. Note that this is a sample flow and can be modified.
1. Sales orders are entered and booked through Order Management. Reserving the order creates a high-level allocation in Process Inventory.
2. Before an order can be picked and shipped, it must be pick released. The Pick Release process can invoke automatic inventory allocation and creates a process move order.
3. Process move orders allow you to manually assign available Process Inventory to a move order or pick from a list of available lots. Lines that have been automatically allocated may be viewed and edited. Once an order line is allocated (detailed), it is pick confirmed.
4. Deliveries and trips are created in Shipping Execution. Containers can also be used.
5. Once you have verified the allocation of inventory to an order, it needs to be Pick Confirmed. This step can be automated or done through the process move orders form in Process Inventory. After the pick confirm, allocated inventory is marked as staged.
6. Ship confirm is the final process in Shipping Execution which records the actual shipped amounts and creates backorders, if necessary. At the completion of ship confirm, on hand inventory is decremented for the shipped quantity.
7. Auto Invoicing allows billing of confirmed shipments. This process can be setup to run automatically upon shipment of an order or be invoked manually. Invoicing and cash receipt are handled within Oracle Receivables.
8. The final step in the process is the running of the subsidiary ledger update to create the entries for Inventory and Cost of Goods Sold.
Diagrammatic Representation:
Slide68
Order Management:
Table Relation Diagram
                                                       Image ppt page no:134
Flow How the Tables Effected
ENTERED:
NAV-> ORDERS. RETURNS -> SALES ORDERS
SELECT * FROM OE_ORDER_HEADERS_ALL WHERE ORDER_NUMBER = 56728
— HEADER_ID = 94100 (FLOW_STATUS_CODE = ENTERED, OPEN_FLAG=Y, BOOKED_FLAG=N)
SELECT * FROM OE_ORDER_LINES_ALL WHERE HEADER_ID = 94187
— LINE_ID = 195947(FLOW_STATUS_CODE=ENTERED)
NOTE: – If U have set the auto schedule option your order should have a schedule date at this point.
BOOKED:
NAV-> ORDERS. RETURNS -> SALES ORDERS -> HIT BOOKED TAB
SELECT * FROM OE_ORDER_HEADERS_ALL WHERE ORDER_NUMBER = 56728
— HEADER_ID = 94100 (FLOW_STATUS_CODE = BOOKED, OPEN_FLAG=Y,BOOKED_FLAG=Y)
SELECT * FROM OE_ORDER_LINES_ALL WHERE HEADER_ID = 94100
— LINE_ID = 195947(FLOW_STATUS_CODE=AWAITING_SHIPPING)
SELECT * FROM WSH_DELIVERY_DETAILS WHERE SOURCE_HEADER_ID = 94100
— (RELEASED_STATUS = R)
PICK RELEASED:
NAV-> SHIPPING -> RELEASE SALES ORDERS -> RELEASE SALES ORDERS
SELECT “BASE ON RULE” AS –> STANDARD
PROVIDE THE “ORDER NUMBER” THEN HIT “EXECUTE NOW”
HERE U CAN CHECK THROUGH THE FRONT END IN LINE LEVEL STATUS WILL BE “PICKED”.
SELECT * FROM WSH_DELIVERY_DETAILS WHERE SOURCE_HEADER_ID = 94100
— (RELEASED_STATUS = Y)
SELECT * FROM WSH_PICKING_BATCHES WHERE ORDER_HEADER_ID = 94100
SELECT * FROM WSH_NEW_DELIVERIES WHERE SOURCE_HEADER_ID = 94100
SHIP CONFIRMED:
NAV-> SHIPPING -> TRANSACTIONS
SELECT * FROM WSH_DELIVERY_DETAILS WHERE SOURCE_HEADER_ID = 94100
— (RELEASED_STATUS = C)
EXAMPLE:
select
ooh.order_number,
ooh.ORDERED_DATE,
ooh.FLOW_STATUS_CODE,
ool.line_number,
msi.SEGMENT1,
msi.DESCRIPTION,
ool.ordered_quantity,
ool.UNIT_SELLING_price,
ool.UNIT_SELLING_price*ool.ordered_quantity total,
ooh.sold_to_org_id,
ooh.ship_to_org_id,
ooh.invoice_to_org_id,
ool.inventory_item_id
from
oe_order_headers_all ooh,
oe_order_lines_all ool,
hz_cust_accounts hca,
mtl_system_items msi
where
ooh.header_id=ool.header_id
and ooh.sold_to_org_id=hca.cust_account_id
and msi.INVENTORY_ITEM_ID=ool.INVENTORY_ITEM_ID
and msi.ORGANIZATION_ID=ool.SHIP_FROM_ORG_ID
and ooh.order_number=56308
order by ool.line_number
TCA – Trading Community Architecture
Parties are entities, of type Person, Organization, or Group, that can enter into business relationships.
A relationship represents the way two entities interact with each other, based on the role that each entity takes with respect to the other. For example, the employment relationship between a person and an organization is defined by the role of the person as
the employee and the organization as the employer.
Relation ship type
Each relationship phrase and role pair belongs to a relationship type, which categorizes the types of relationships that you can create.
Relationship Group
Relationship groups are used to determine which relationship roles and phrases are displayed in specific application user interfaces. Groups can also be used to categorize roles and phrases for other functional uses.
TCA Registry
The TCA Registry is the central repository of party and other information for all Oracle applications. The party information includes details about organizations and people, the relationships among the parties, and the places where the parties do business.
Hz_parties –
Party_id —     This table mainly stores the party_id, party_number,
Party_type(Person/Organization) and the name(First Name/Last Name and
Party_name(first-last name together)) of the party/customer. The first name or last
name should be given to create a party.
Hz_cust_accounts/Hz_cust_accounts_all –
This has mainly the party_id and Cust_account_id — (called as Customer_id) Account_number — (called as Customer_number)
(The hz_cust_accounts_all(till version 11.5.9), is not populating the org_id column. So this table is anyway meaning less for these versions. Not sure though there is a set up related to it which can enable this field.)
This table can have multiple records pertaining to one party_id. This means a party can have multiple accounts. Ie; ,we can have multiple cust_account_ids created for a single party in hz_cust_account table. And also under each cust_account_id we can have multiple addresses,
To create another customer_account(differenct cust_account_id), select the customer with the Name from the standard customer creation search screen,(Take care not to select the customer from LOV, since it directly selects the cust_account_id/account_number and once you press OK, you get only that cust_account_id/account number and not all the customer accounts. So enter manuallythe customer name, press OK and this takes you to the screen,
Slide70
Select the top most records. Here we can see 4 records. 1st is the Main Line, which needs to be selected for creating new customer accounts for this customer. We can see that there are 2 different customer numbers(account number, in this screen cust_account_ids
won’t be shown) here(1441, and 1442). 1442 is repeating because that account is having 2 different sites(address sites).
Hz_cust_acct_sites_all –
HZ_CUST_ACCT_SITES_ALL stores information about customer sites. One customer account can have multiple sites. The physical address is maintained in HZ_LOCATIONS.
Gives you all the sites or address defined pertaining to an account. (although the cust_account_id is same, the org_id’s might be different.) [ If the records are related to an order, you can take the ship_to_org_id, which is nothing but the cust_account_id related to the Bill_to address and link it with the table, hz_cust_accounts (using cust_account_id) and then link it with the cust_account_id of
hz_cust_acct_sites_all table like this,
FROM OE_ORDER_HEADERS_ALL OH,
HZ_CUST_ACCOUNTS HCA,
HZ_CUST_ACCT_SITES_ALL HCAS,
hz_cust_site_uses_all HCSU
WHERE OH.SOLD_TO_ORG_ID = HCA.CUST_ACCOUNT_ID
AND          HCA.CUST_ACCOUNT_ID = HCAS.CUST_ACCOUNT_ID
AND          HCAS. CUST_ACCT_SITE_ID = HCSU.CUST_ACCT_SITE_ID
AND          HCAS.BILL_TO_FLAG = ‘P’
Hz_cust_site_uses_all —
HZ_CUST_SITE_USES_ALL stores information about site uses or business purposes. A single customer site can have multiple site uses, such as bill to or ship to, and each site use is stored as a record in this table. Link this table with hz_cust_account_site_all with the field, CUST_ACCT_SITE_ID. Here is where the and each address can have one(only one primary) Bill_to or Ship_to address. The primary bill_to, ship_to will be the ones which are normally used for ‘site use’ level transactions. For one cust_account_id with different addresses,(see it in hz_cust_acct_sites_all table for these different address lines), we can make only one bill_to or ship_to as primary. If we get multiple records pertaining to an account, for a Bill_to, check for the field,BILL_TO_FLAG = ‘P’ (Means primary). IF we have multiple address/site for a particular cust_account_id, Only one bill_to address can be ‘P’, under a cust_account_id, although we can define multiple bill_to addresses(Note : one address/site can have only one bill_to)and all the transactions through the system will be done with the primary bill_to address.
Hz_contact_points –
This table stores the contact details of the customer. The contact details are stored against a site, if owner_table_name is equated against the hz_party_sites table. If it is equated against the hz_parties then the contacts are against the customer not against
the customer site.
If a contact point is created against a customer site(address).
SELECT LTRIM(hcp.phone_country_code||’-‘||hcp.phone_area_code||’-
‘||hcp.phone_number,’-‘) Home_Phone, hcp.PRIMARY_BY_PURPOSE,hcas.org_id,
hcas.party_site_id,hca.cust_account_id,hcas.cust_acct_site_id,
hcp.CONTACT_POINT_ID,hcp.CONTACT_POINT_TYPE,hcp.PHONE_LINE_TYPE,
hcp.OBJECT_VERSION_NUMBER
FROM hz_parties hp,
hz_party_sites hps,
hz_cust_accounts hca,
hz_cust_acct_sites_all hcas,
hz_contact_points hcp
WHERE hp.party_id = hps.party_id
AND hca.party_id = hp.party_id
AND hp.party_type IN (‘ORGANIZATION’, ‘PERSON’)
AND hp.status = ‘A’
AND hcas.party_site_id = hps.party_site_id
AND hca.cust_account_id = hcas.cust_account_id
AND hcp.contact_point_type = ‘PHONE’
AND (hcp.OWNER_TABLE_NAME = ‘HZ_PARTY_SITES’ AND hps.party_site_id =
hcp.owner_table_id)
AND hcp.phone_line_type = ‘TELHOME’
AND hcp.status = ‘A’
If a contact point is create against a customer.
SELECT LTRIM(hcp.phone_country_code||’-‘||hcp.phone_area_code||’-
‘||hcp.phone_number,’-‘) Home_Phone, hcp.PRIMARY_BY_PURPOSE,
hca.cust_account_id,hcp.CONTACT_POINT_ID,hcp.CONTACT_POINT_TYPE,hcp.PHONE_L
INE_TYPE,hcp.OBJECT_VERSION_NUMBER
FROM hz_parties hp,
hz_cust_accounts hca,
hz_contact_points hcp
WHERE hca.party_id = hp.party_id
AND hp.party_type IN (‘ORGANIZATION’, ‘PERSON’)
AND hp.status = ‘A’
AND hcp.contact_point_type = ‘PHONE’
AND (hcp.OWNER_TABLE_NAME = ‘HZ_PARTIES’ AND hp.party_id =
hcp.owner_table_id)
AND hcp.status = ‘A’
HZ_customer_profiles —
There will normally be a default profile attached against a customer as soon as the Since the default profile is attached against the customer(and not against the site_use level), when you query the hz_customer_profiles tables we can see that that site_use_id
for this particular profile would be null.
If the profile is created against the customer site_use level, then the corresponding site_use_id will be populated for this customer profile record in the hz_customer_profiles table.
See the below query for reference,
[ select hcp.CUST_ACCOUNT_PROFILE_ID,
hcp.OBJECT_VERSION_NUMBER,
hcp.cust_account_id,
hcp.ATTRIBUTE1 LTV_Veh_sales,
hcp.ATTRIBUTE2 LTV_Number_Of_Veh,
hcp.ATTRIBUTE3 LTV_Service_Sales,
hcp.attribute4 LTV_Service_In,
hcp.attribute5 Cust_Cate_RFM_Veh,
hcp.attribute6 Cust_Cate_RFM_Service_In,
hcp.ATTRIBUTE7 Customer_Remark,
hcp.ATTRIBUTE8 Latest_Vehicle_Sales_Date,
hcp.ATTRIBUTE9 Latest_Service_In_date,
hcp.ATTRIBUTE10 Latest_Contact_Date,
hcp.ATTRIBUTE11 Expected_Contact_Date,
hcp.ATTRIBUTE12 Expected_Sales_Date,
hcp.ATTRIBUTE13 Expected_service_Date,
hcp.ATTRIBUTE14 Hobby1,
hcp.ATTRIBUTE15 Hobby2
FROM
hz_customer_profiles hcp, hz_cust_acct_sites_all hcas,
hz_cust_site_uses_all hcsu where hcas.cust_account_id = hcp.cust_account_id and
hcas.cust_acct_site_id = hcsu.cust_acct_site_id
and hcp.site_use_id = hcsu.site_use_id
and hcp.status = ‘A’ ]
Slide71

Tuesday, October 11, 2016

Oracle Alerts in R12

1  Overview of Oracle Alerts
2  Defining Alerts
3  Type of Alerts
4  Check the Alerts

Overview of Oracle Alerts:

·                      Keep you informed of critical activity in your database
·                      Deliver key information from your applications, in the format you choose
·                      Provide you with regular reports on your database information
·                      Automate system maintenance, and routine online tasks

Overview:


Oracle Alert is your complete exception control solution.

Oracle Alert facilitates the flow of information within your organization by letting you create entities called alerts to monitor your business information and to notify you of the information you want. You can define one of two types of alerts: an event alert or a periodic alert.

An event alert immediately notifies you of activity in your database as it occurs. When you create an event alert, you specify the following:

·                      A database event that you want to monitor, that is, an insert and/or an update to a specific database table.
·                      A SQL Select statement that retrieves specific database information as a result of the database event.
·                      Actions that you want Oracle Alert to perform as a result of the database event. An action can entail sending someone an electronic mail message, running a concurrent program, running an operating script, or running a SQL statement script. You include all the actions you want Oracle Alert to perform, in an action set.

A periodic alert, on the other hand, checks the database for information according to a schedule you define. When you create a periodic alert, you specify the following:

·                      A SQL Select statement that retrieves specific database information.
·                      The frequency that you want the periodic alert to run the SQL statement.
·                      Actions that you want Oracle Alert to perform once it runs the SQL statement. An action can entail sending the retrieved information to someone in an electronic mail message, running a concurrent program, running an operating script, or running a
·                     SQL statement script.


Defining Alerts:


Navigator: Alert Vision Manager USA

To define Alerts

https://blogger.googleusercontent.com/img/b/R29vZ2xl/AVvXsEhX0IkdkJCBd_87F6mHFYZ-LiKG9xY9AbQFivaw5caReDo9yk7rpHsNf62gQZ9EphirSe_UmHULD8MdkV2uuVuCPeCPTQd3ey5A11HqLPuW2g_vndzSA0c5k6KkhnIpm7w2Kk0tDh5sygo/s320/image001-734096.png

Types of Alerts:

1. Periodic Alerts


Periodic alerts periodically report key information according to a schedule you define.

To define a periodic alert:
1. Navigate to the Alerts form.
2. Enter the name of the application that owns the alert in the
Application field. This application must reside in the same Oracle database as Oracle Alert.
3. Name the alert (up to 50 characters), and give it a meaningful description (up to 240 characters).
4.Enter a name for the alert that is unique within the application. Use an initial character other than a pound sign (#), a colon (:), or a percentage sign (%).

1.                  Select a frequency for your periodic alert. You can choose from nine frequency options:
2.                   
Frequency :

On Demand             :-We have to run the alert to fire.

Enter which Application u want to specify alerts, name of the alert,
Click whether its periodic or Event

On Day of Month: It will fire last day of every month.
It will start from 12 AM up to 11 AM morning and each 2 hours interval the alert will fire once.
           Exa: 12AM, 2 AM, 4 AM … … … … 8am, 10am.

https://blogger.googleusercontent.com/img/b/R29vZ2xl/AVvXsEiLU0w58EYbT2SzfW_7RjxrPqq-vHg7YLJNiALDQQGbWz4jLVdJJbB6SxRJyFlvxhrfyiKgZ0Bms1kU5vzz0M-FW23qKxpV-h6StThPloVUgdKsgpH6U37GBLe1oVin-cyjoyQUJvnm4xQ/s320/image002-737933.jpg

On Day of Week : Same as On day of Month.

Every N Calendar day: It will fire in each two days.

Every N Business Day: It will fire once in each three business day.(It will not count the holidays)

Every Day:  It will fire daily

Every Other Day :  It will fire in a alternative day.

Every Business Day: It will fire every day except holiday.

Every Other Business Day: It will fire in an alternative business (working) day.
i.e  It will not consider holidays

Import :  We can import the files(which contain the query) if the query size is big, if it exceed the memory.
https://blogger.googleusercontent.com/img/b/R29vZ2xl/AVvXsEilEbPj-MsIpszgzxuVFz_NjyblbHpXXbJOd-gqTEkoVszmp2fLsUIKTtZqGQAdtYzPJRfbpLsT26G4UNOqojvXRmw04WuRNGeAFfb7Qu85XncVLsm_hv-yO27404tbphlQ8jH8U_J_T78/s320/image003-742530.jpg

https://blogger.googleusercontent.com/img/b/R29vZ2xl/AVvXsEgpcZnh0Fr8PQ5WfZU5WtnjSoWAcuA31bawW1T3HpbF4aSU92tDux1vHlbT-AZ5WHEqKhs03NfPggbsnMUr91T8mTg17HMFydrTisEP2M7Cu6VTqHTBzhVTKKCoSit_I9XCit68shRfiA4/s320/image004-749943.png
https://blogger.googleusercontent.com/img/b/R29vZ2xl/AVvXsEiPDcFUIDdqMOmxIQKlyszJW8cCLLcHmuG_kaWZbSR40_-fBYIptKLDO0YFDdg_ygIphqEsHpqIjQg7xUafpf1YfrOp_ZI1Zdy6j-LI57gb38t3FWUXD4J91_dYJoLO_LTuVib1bfWIduI/s320/image005-752458.png


After writing the Query in Select Statement area click on Verify  to verify the query and
https://blogger.googleusercontent.com/img/b/R29vZ2xl/AVvXsEjfOSsQO5tyPFBrb61pIQh-7p4-nBbLmnh98ZqsSe3QeBDqc2KCPx-7lv0wU6mfjYTyryMidTgh-HCYhAtR61ldoWJ3l3MXFvOtzaWVszVrzlomijFfkvuJ53IRD-NXPHqjkhSti4GyQqw/s320/image006-765184.jpg

After Click on Verify Button the following message will come.
        Click on OK and Save

Then click on Run  to execute the query. 
https://blogger.googleusercontent.com/img/b/R29vZ2xl/AVvXsEiYC2vy-o9ZTveGNz92ky_kc4A1-06JwbSfPnW1Pbk80uSXlwrP1hH7nlBN-CPvh2Bdo96ew8muN_LSgYqoWIRYSp9VAdV_QdRhkDLUPaSiBZ9ScdAu9xFntnua62ch_oNzzwpCMbSlXfM/s320/image007-771352.jpg
            Click on Run  button , the following screen will come. And click on OK.

2 . Click on Actions  Button and enter the Action information  like following screen
Details Action perform once for each exception found,
Summary Action perform once for all exception found
No exception performs when no exception was found.

https://blogger.googleusercontent.com/img/b/R29vZ2xl/AVvXsEjj4BIgcZtutx4-h2g3VmlRSgmad8zsrrlceGpOOXzGJbfctcjhbN0aaGNd3zbvksiw1WDvsx0aUaY2lf15RzL4YbUa6p8y2c_5uGlwaNHyDr4GBfo2eZ_OOlkFARwRj91TNIVcqiMb6JM/s320/image008-786989.jpg

2.click on Action Details  and enter the value  and save.
Concurrent Program :  Used to execute the Concurrent program.
https://blogger.googleusercontent.com/img/b/R29vZ2xl/AVvXsEiAk9pu0SRJbjW3baBsPPzL3PiolTMURKeM79qjRs9krDEjHThu-8sehpXcWf3Z2BAgM8C_nP9GD7ZqLuJpgFWrGo2Jg5SRyTw1ow-3HpauQ8WBIXdKcHvpmtClAXYnkqVNAIp3ZECeBxw/s320/image009-700468.jpg

Message : Used to send the message via mail.
https://blogger.googleusercontent.com/img/b/R29vZ2xl/AVvXsEiQ6dIWCI29YjPXLa-hmIn5wHtn-2ma-mxjc9R8zE3yM3oy6rN4RQW6I-DR3pVK5s6PWlrOIUEZlKjbJ2xFs5o68f35r1m60kmp7PzIefjDlH9Op0CqF3VB177t5m94_St0GrDPeHwlwQI/s320/image010-706753.jpg

Operating System Script:  Used to run the OS Script.
https://blogger.googleusercontent.com/img/b/R29vZ2xl/AVvXsEhvEQUjdcg-CdYtF1i15bFWkgGimtEdJNRKNRlTCxGQBeiswjL_ykaYXtGpVHVhaz51zDk_23CaOEZAXaz16Q7eSwAQsZkVCbfvjbojOwCY03CS2eibJZnZLa4pZhmMAVhNbjisOrteeGg/s320/image011-710866.jpg

SQL Statement Script : Used to run the SQL statement Script.
https://blogger.googleusercontent.com/img/b/R29vZ2xl/AVvXsEhpJoQkVpNkGJKFhQj1O9p7GN0eUlBqwC3RKq6AtiS9r_NVIwLdrIeHMf-OZwbUNMbGQGuJoHd-V6KG-IM-4WmroeE9-2MvQZN4Kg3k8xE3K-jcNgO1nl0p5613-ldGWFweyHFlryJXe_g/s320/image012-715440.jpg

3. Click on Action Sets   button   from Alert window
https://blogger.googleusercontent.com/img/b/R29vZ2xl/AVvXsEjuxzxWdspEFKvPwkFHFfY-mwCtuB6AhigU1cimFUplFwvRjfkMyLtHLjpOpHx7KxfdEl0xpll2ahJ547DWZBvsLANzjHHOaVdupXFMe6iLJFG6lzHv-7CZKxwHbR9pGDyLCRqVvOuf03Y/s320/image013-721165.jpg
Then click on Action Set Details
https://blogger.googleusercontent.com/img/b/R29vZ2xl/AVvXsEgdHsFTyhBWrAVsEsxhBLOBcS_VRinmqLKaW5fb1Gx2DzB3VCzbz1toAilkBdEYN7PpebbaGIFvxeR2_mgxfAHqso_dZAyqq5MKrCMUyvnnmGjfosVdnx9gxra3caPvSGQoql2V9bHNakY/s320/image014-726308.jpg
https://blogger.googleusercontent.com/img/b/R29vZ2xl/AVvXsEiVzr78eaxJv8xKYjADZ1zyMEnk5T0v6CsfyYBOmDZ3yb9oDZgJNafF9ZMRU6SlW7zGCWxAvXMeY4-KgQGuORTohRqYG2voaeBgmB3W_KKPib7IxsU2MuonBKxMzGin4xpNQFHJ7lrn-T0/s320/image015-731530.jpg

https://blogger.googleusercontent.com/img/b/R29vZ2xl/AVvXsEjhFyvjlAk8Z5I4HbTiVuRIQzJ5Ks2XZnHNRYNmNwoPiDpDlWpIcCYX2fo0nbIQIUXIRz0SGQECw-LN95CHOyyIMLls8TTwbVbjB4EuhT_giF4JpEflc27oUyoxmD6nCKmmD4tw3wp5HzM/s320/image016-735958.jpg

4. Then click on Alert Details from the Alert window and enter the value and save.
https://blogger.googleusercontent.com/img/b/R29vZ2xl/AVvXsEg1rsKflhB3LMoPzsmiVe27JeoYK4K8zztV7MF3q0y5yIVih19M892QuE7Of73EMPfxtBgoDRrA9Fgs5B1I9xtS0vK3kn11l20U7iLnhLOmnhoylp_Rj0ZG03KpQm6w_uphpa8WZAnZkUE/s320/image017-740070.jpg

https://blogger.googleusercontent.com/img/b/R29vZ2xl/AVvXsEjKwZflJXYY0pCnUUD3pXYuUQ_zTJTZVZkQ3cRY9LhMf4o54CI9AFtbCaKRjtOd9Yik1kSE4kLQDIcomRuWnLj7M80A4HrIhOzlsEmVtUFwieIFH1mvr_tcrOEVBlVNk93tYZBZPhFI4KQ/s320/image018-745225.jpg


Event Alerts:        


Creating an Event Alert
To create an event alert, you perform the following tasks in the order listed:
• Define the database events that will trigger your alert
• Specify the details for your alert
• Define actions for your alert
• Create action sets containing the actions you want your alert to perform
This section focuses on the first task of defining the database events that trigger your event alert and divides the task into smaller sub–tasks.

To define an event alert:
1. Navigate to the Alerts form.
2. In the Application field, use the list of values to choose the name of the application that owns the alert. This application must reside in the same Oracle database as Oracle Alert.
3. Name the alert (up to 50 characters), and give it a meaningful description (up to 240 characters).
Enter a name for the alert that is unique within the application. Use an initial character other than a pound sign (#), a colon (:), or a percentage sign (%).
4. In the Type field, choose Event.
5. Check Enabled to enable your event alert.

https://blogger.googleusercontent.com/img/b/R29vZ2xl/AVvXsEjon8zLO4xUxpvyyvX0ldJYNkYA8P96Bve09DQQOBXk7g0xDxJ2EsiGZc64E1zbwosAqhkEwAyowRhOac3KzEHrFHF_9ZvIZRV2y7qeyejCZ9WbBl3Rz8r-E8drEwuteX667QEbZHedSLA/s320/image019-748115.jpg

To specify the alert details for an event or periodic alert:
1. With your alert definition displayed in the Alerts form, choose Alert Details. The Alert Details window that appears contains three tabbed regions: Installations, Inputs, and Outputs.

2. In the Inputs tabbed region, Oracle Alert automatically displays the inputs used in your Select statement, unless they are the implicit

inputs: :ROWID, :MAILID, :ORG_ID and :DATE_LAST_CHECKED.

The values of the implicit inputs are as follows:

• ROWID—Contains the ID number of the row where the insert or update that triggers an event alert occurs.
• MAILID—Contains the email username of the person who enters an insert or update that triggers an event alert.
• ORG_ID—Contains the organization ID that is selected when the alert runs.
• DATE_LAST_CHECKED—Contains the date and time that the alert was most recently checked.

3. You can optionally add a description for each input, but you must specify the data type (either character, number, or date) for the input, because Oracle Alert uses the data type to validate the default values for inputs you enter in the Default Values field and in the Action Set Inputs tabbed region of the Action Sets block.

4. Enter a default value for your input. You can enter up to 240  characters. This value automatically becomes the default value for your input in each action set you define.

5. In the Outputs tabbed region, Oracle Alert automatically displays the outputs used in your alert Select statement without the ampersand (&) and any numbering format. You can add meaningful descriptions for the outputs.

6. You can specify the maximum number of output characters you want to display in your detail or summary message actions. See: Formatting Summary Message Actions:

7. If your output value is numeric, enter the SQL*Plus format mask in the Number Format field.

8. You can also check the Check for Duplicates check box to customize the combination of outputs you want to verify as a possible duplicate exception each time the alert is checked. A duplicate exception is an exception that existed in your database during previous alert checks. You can define Oracle Alert to perform certain actions based on the presence of these duplicate exceptions.

9. In the Installations tabbed region, specify an Oracle ID if you want Oracle Alert to check your alert against that specific Oracle ID. You can select only those Oracle IDs that are associated with the application that owns your alert.
If you do not specify an Oracle ID in this region, Oracle Alert checks your alert against all installations in your database of the application that owns your alert.

10. If you have multiple organizations defined in your Oracle Applications schema, you must specify the organization you want the alert to run against in the Operating Unit field.

Click Action details,

In Action details Navigator
They are four types of Actions

Concurrent Program :       Used to execute the Concurrent program.
Message :                             Used to send the message via mail.
Operating System Script:  Used to run the OS Script.
SQL Statement Script :      Used to run the SQL statement Script.

Check the Alert:

1.                  Go to Alert Manager
(N) Request>Check
https://blogger.googleusercontent.com/img/b/R29vZ2xl/AVvXsEhlSUZWPUU8sl-BhBymBUqGx3JEl8s0sqZlwXcrYyxOiuZfr1zzsmfnVkMEXx2ITDnPeYkLuwp6zrp6Tz5scuK4zP2HYXxFviLNrN8HVVEXMArsqlD7RAJSKt_XEPrZr5NPrXLN-k4Pg3U/s320/image020-756217.png

Then View> Request >Find from Alert Manager responsibility.
https://blogger.googleusercontent.com/img/b/R29vZ2xl/AVvXsEhSofPAzf0xxn4-WdUHNmsNUYdCvQitH2cIQn_TZeenfzruMSxqQrZDBfX7SDl1-Gqkocad_tA7IwKbN_4IiJXfr17sLczMVCfutbwkNpJlTP0vSMw17H_wKpEkBBCAT11viuvB6s8ZbfY/s320/image021-766373.jpg

After completed Normal check the mail.

Query to Find Out Oracle Alerts

The following query finds all enabled custom alerts. You can comment out the very last two lines (alr.enabled_flag and alr.created_by) to display all both enabled and disabled alerts.

-------------------------------------------------------------------------------
-- Query to find Custom Oracle Alert
-------------------------------------------------------------------------------
SELECT alr.application_id,
alr.alert_id,
alr.alert_name,
alr.start_date_active,
alr.description,
alr.sql_statement_text
FROM alr.alr_alerts alr
WHERE 1=1
AND alr.created_by <> 1 -- show only custom alerts
AND alr.enabled_flag = 'Y'; -- show only enabled alerts


Oracle Apps Alerts Tables:

Oracle Apps Alerts Table
ALR_ACTION_DATA
ALR_ACTION_GROUP_MEMBERS
ALR_ACTION_GROUPS
ALR_ACTION_HISTORY
ALR_ACTION_OUTPUTS
ALR_ACTION_SET_CHECKS
ALR_ACTION_SET_INPUTS
ALR_ACTION_SET_MEMBERS
ALR_ACTION_SET_OUTPUTS
ALR_ACTION_SETS
ALR_ACTIONS
ALR_ACTUAL_RESPONSES
ALR_ALERT_CHECKS
ALR_ALERT_INPUTS
ALR_ALERT_INSTALLATIONS
ALR_ALERT_OUTPUTS
ALR_ALERTS
ALR_ALERTS_A
ALR_DISTRIBUTION_LISTS
ALR_LOOKUPS
ALR_MESSAGE_SYSTEMS
ALR_ORACLE_MAIL_ACCOUNTS
ALR_OUTPUT_HISTORY
ALR_PERIODIC_SET_MEMBERS
ALR_PERIODIC_SETS
ALR_PROFILE_OPTIONS
ALR_RESPONSE_ACTION_HISTORY
ALR_RESPONSE_ACTIONS
ALR_RESPONSE_MESSAGES
ALR_RESPONSE_SETS
ALR_RESPONSE_VARIABLE_VALUES
ALR_RESPONSE_VARIABLES
ALR_VALID_RESPONSES

Oracle Fusion - Cost Lines and Expenditure Item link in Projects

SELECT   ccd.transaction_id,ex.expenditure_item_id,cacat.serial_number FROM fusion.CST_INV_TRANSACTIONS cit,   fusion.cst_cost_distribution_...