Building a Web Application Using EJB, JPA, and JavaServer Faces
In this tutorial, you will use the rich functionalities provided within JDeveloper 12c to create a web application based on EJB, JPA and JavaServer Faces.
The application to build reflects the Model-View-Controller architecture. The model is provided by EJB Components, while the view and controller are provided by JavaServer Faces.You use the ADF Faces set of JSF-compatible components to build a richer web interface.
This tutorial requires to have JDeveloper 12.1.2. installed and to have access to an Oracle database 10g and onward with access to the HR schema.
| Purpose | Duration | Application |
|---|---|---|
In this tutorial, you use Oracle JDeveloper 12c Version 12.1.2.0.0 to build a web application. To build the data model, you use the EJB diagrammer, EJB 3.0 and Java Persistence API (JPA). For the web client side, JavaServer Faces (JSF) is used. A main master-detail page is created with query and edit functionalities in the user interface. A task flow, with a search functionality, is also added as a region to the page.
To see the complete application you will create, click the Download button to download a zip of the final application, and then unzip it in your JDeveloper mywork folder. | 90 minutes |  |
Before you create any components, you must first create an application and projects.
- Start JDeveloper by selecting Start > All Programs > Oracle Fusion Middleware 12.1.2.0.0 > JDeveloper Studio 12.1.2.0.0
- If prompted for a Role, choose Studio Developer (All Features) and click OK.
- Close the Tip of the Day window.Once loaded, the JDeveloper IDE appears. The very first time you open JDeveloper, the Start Page displays. You can re-invoke the Start Page later by choosing Help | Start Page.Notice the various options available to help you learn about JDeveloper. After exploring these options, click the X on the Start Page tab to close it. (the X appears when you mouse over the tab).
- Click the Application tab to go back to the Applications window. Click the New Application icon.
- In the New Gallery, select the Fusion Web Application (ADF) option.Click OK.
- In the Create Application dialog box, enter the Application Name HR_EJB_JPA. Notice that as you enter the application name, the directory name changes automatically. Enter oracle as the Application Package Prefix.Choosing the Fusion Web Application option creates 2 projects.
Clicking Next on each page of the wizard and leaving the default values shows you the project names and package names that are going to be used. It also allows you to select specific features for the Model and ViewController projects.
The default name for the first project is Model as the project name and oracle.model as the package name.
The default name for the second project is ViewController as the project name and oracle.view as the package name.. - Click Finish. Wait for JDeveloper to create your application environment.
- The Applications window displays the two projects created. On the right pane, notice the application overview allowing you to keep track of the steps as you complete them.There are now 2 projects in your application. The Model project is empty and will be populated with EJB JPA components after the creation of a database connection.
The ViewController project contains the basic components for building the UI.
The Overview pane guides you through your application development. You can use it and follow the step-by-step instructions to build your applications.


- In the Applications window, right-click the Model node and select New > From Gallery from the context menu.
- In the New Gallery select the All Features tab, then select Business Tier > EJB as the category and double-click the Entities from Tables item.Click OK.
- In the Create Entities from Tables wizard, select JPA 2.0 Entities (Java EE6), then click Next.
- Click Next to skip the persistence unit definition.
- In the Type of Connection page choose the Online Database Connection option. Then click Next.
- In the Database Connection Details page, click the Create button
to create a new connection.
- Provide the following values to create the database connection to the hr schema. Note that the values provided here as examples may need to be modified to work with your environment.
Option Value Connection Name HR Username/Password hr / <your hr password> Save Password Checkbox checked Driver Thin Host Name The machine where the schema is installed (e.g. localhost) SID The database where the HR schema is installed (XE, orcl...) - Click Test Connection to confirm that you can connect.Click OK if the connection was successful.If the connection fails, check that the parameters entered are correct and that the Oracle database and listener services are running.
The connection should also appear in the Initialize Business Components Project page. - Back in the Database Connection Details page, click Next.
- In the Select Tables page, click Query to retrieve the available objects for the HR schema. Then select DEPARTMENTS and EMPLOYEES and shuttle the selection into the Selected pane using the right arrow button
.
Click Next. - In this step, make sure the package name is oracle.model.
- Click Next, then Finish.
- Click the Save All
icon to save your work.


In the Applications window one java class file is created for Departments and one for Employees.

An EJB diagram is a way to create and visualize entities, java beans and relationships between these components. To create an EJB diagram perform the following steps:
- Right click the Model node in the Applications window and select New > From Gallery.
- In the New Gallery select Business Tier > EJB as the category and double click EJB Diagram (JPA/EPA 3.x).
- Click OK.
- In the Create EJB Diagram dialog, change the default name for the diagram (EJB Diagram1) to HR EJB Diagram.The default Package name should be oracle.model.
- Click OK.
- On the Associate Diagram With Persistence Unit dialog, click OK to accept the proposed Persistence Unit (Model.jpr).
- A new empty diagram opens in the diagram editor.
b
Modeling EJB/JPA components on a diagram can be useful for the developer.Read more... Enterprise JavaBeans (EJBs) modeling helps you visualize your EJB entity relationships and architecture, and to quickly create a set of beans to populate with properties and methods, and to create a graphical representation of those beans and the relationships and references between them. Whenever a bean is modeled, the underlying implementation files are also created.
- Select the Departments and Employees entities from the Applications window and then drag them onto the diagram.
- Click the Save All


The diagram displays the EJB components that you just created from the Departments and Employees tables. Zoom in if necessary and reorganize the layout of the diagram to have both entities horizontally aligned. You can tidy the diagram by selecting relationships and using the Straighten lines option from the context menu.

A session facade presents client objects with a unified interface to the underlying EJBs (Enterprise JavaBeans). The client interacts only with the facade, which resides on the server and invokes the appropriate EJB methods. As a result, dependencies and communication between clients and EJBs are reduced. If you are performing remote access without a session facade, numerous remote calls are needed for the clients to access EJB 3.x entities directly over the network. This results in a large amount of network traffic that negatively affects performance. In addition, without a facade the client depends directly on the implementation of the business objects, so that if the interface of an EJB changes, client objects have to be changed as well.
In this step, you create a session bean that implements a method to find employees and departments records.
- In the Components window, select the EJB Components library and open the EJB Nodes.
- Select the Session Bean
component and then drag and drop it onto the diagram.
The Create Session Bean Wizard opens. (If necessary, click Next on the Welcome step.) - In the EJB Name and Options step, set the EJB Name to HRFacade and make sure that the following values are properly set:
Property Value EJB Name HRFacade Session Type Stateless Transaction Type Container Generate Session Facade Method (Checked) Entity Implementation JPA Entities Persistence Unit Model - Click Next.There are two types of session bean, Stateful and Stateless.
A stateful session bean maintains conversational state on behalf of the client. A conversational state is defined as the session bean field values plus all objects reachable from the session bean fields. Stateful session beans do not directly represent data in a persistent data store, but they access and update data on behalf of the client. The lifetime of a stateful session bean is typically that of its client.
Stateless session beans are designed strictly to provide server-side behavior. They are anonymous because they contain no user-specific data. The EJB architecture provides ways for a single stateless session bean to serve the needs of many clients. All stateless session bean instances are equivalent when they are not involved in serving a client-invoked method. The term stateless means that it does not have any state information for a specific client. However, stateless session beans can have non-client specific state, for example, an open database connection.
Use Container for a transaction being handled by the session facade and bean for managing user transaction explicitly through a programmatic process. - In the Session Facade step, any entities in this project appear as a node in the tree control. You can select the checkbox to include all entity methods this entity exposes, or expand the nodes and select a subset of methods.
Expand the Employees and Departments nodes and select all methods for each entity. - Click Next.
- In the Class Definition step, make sure that the full name for Bean Class is oracle.model.HRFacadeBean, and then click Next.
- The diagram should now look like the following:
- The Applications window should look like this:The session bean is made up of three files: HRFacadeBean - contains the session bean code. HRFacade - describes the capabilities of the bean for remote clients and HRFacadeLocal describes the capabilities for the local client.
- Click the Save All


In the following step, ensure that both Remote and Local interface implementations are selected. The remote interface is used for client applications that run in a separate virtual machine, such as Java clients, whereas a local interface is used for client applications that run in the same virtual machine, such as Web clients.

Click Next to review the summary of the created classes and then Finish.


You now expose the EJB as a data control for the Oracle ADF framework. This simplifies the way that you bind user interfaces to the EJB. To learn more about the ADF Framework visit: http://oracle.com/technology/products/adf
To create ADF data controls from EJB Session Beans, perform the following steps:
To create ADF data controls from EJB Session Beans, perform the following steps:
- Right-click the HRFacadeBean.java node in the Applications window and select Create Data Control from the context menu.
- In the first step of the wizard, click Next to accept the default name (HRFacadeBean)
- In the Session EJB Business Interface page, select Local, and click Finish..Click the Save All icon
- The Applications window should now look like this:A number of things happen in your project when you create a data control. When you create a data control based on an EJB session bean, JDeveloper creates the data control definition file (DataControls.dcx), opens the file in the overview editor, and displays the file's hierarchy in the Data Controls panel. This file enables the data control to work directly with the service and the bindings.
- Expand the Data Controls accordion to review the components that have been created and are now available for the UI.
- Notice the Data Control Registry displaying the available data controls.
- Expand the HRFacadeLocal node. Selecting the departmentsFindAll node provides details in the right hand side about the data control.The overview editor for the DataControls.dcx file provides a view of the master-detail hierarchies of your data model as well as methods from the session facade.
When you select a node, you can view the bean properties for the corresponding entity class in the Attributes tab. In the Accessors tab, you can view all bean properties for the corresponding entity class that return a collection. In the Operations tab, you can view other methods from the session facade that operate on the entities. - You can collapse the Model project node and right-click any of the tabs to close all open tabs.


The ADF Model provides a declarative way of adding validation and consistent UI control to your application. Once you create a data control, you have access to a fine level of control over display and validation characteristics of that data control.
In the next few steps, you will set the label of several attributes and and a validation rule to the Employees data control.
Part 2: Building the View Project
In this section you will start creating a JSF page using data controls based on EJ/JPA components.
You can design a databound user interface by dragging an item from the Data Controls panel and dropping it on a page as a specific UI component. When you use data controls to create a UI component, JDeveloper automatically creates the various code and objects needed to bind the component to the data control you selected.
You can design a databound user interface by dragging an item from the Data Controls panel and dropping it on a page as a specific UI component. When you use data controls to create a UI component, JDeveloper automatically creates the various code and objects needed to bind the component to the data control you selected.
In the next few steps, you create a JavaServer Faces Page using ADF Faces components for the Departments Employees Master Detail page.
- Right-click the ViewController project and select New > From Gallery from context.
- In the New Gallery, choose the Web Tier > JSF/Facelets category and select Page as the item and click OK.
- Enter mainHR.jsf as the file name.
Check the Facelets checkbox, and in the Page Layout section, click the Copy Quick Start Layout radio button. It is best practice to use the quick start layouts to avoid display issues.
In the Page Layout section of the dialog, click the Two Column category and select the first layout in the list. Click OK to create the page.You now have an empty mainHR.jsf page open in the Design Editor.In the next few steps, you add data-bound ADF Faces components to the page. These components display a department along with the employees belonging to the department. - In the Structure window, select the panelSplitter component and in the Properties window, set the SplitterPosition to 300.
- In the Components window, ADF Faces library, expand the layout section and drag a Panel Accordion component onto the first facet.
- In the Structure window, expand the panelAccordion component, then select the Show Detail Item component and enter Dept in the Text field.
- From the Components window, drag a Panel Splitter component onto the second facet of the page.
- In the Properties window, set the Orientation property to vertical.
- The Structure window should look like the following:
- From the Components window, drag and drop a Panel Tabbed component onto the second facet.
- Expand the af:panelTabbed item in the Structure window and change the text property of the Detail Item to Emp.
- In the visual editor, right-click the Emp tab and select Insert after Show Detail Item > Show Detail Item.
- Enter Graph as the Text for the Show Detail Item component.
- Drag and drop a Panel Collection onto the first facet (top right one).
- The page skeleton should look like the following:
- Click the Save all


In the next few steps, you use ADF Faces to build a query page to edit employee data.
- Open the Data Controls accordion and expand the HRFacadeBean node, then drag and drop the departmentsFindAll node to the first facet.
- In the pop up create menu, select ADF Form... .
- In the Edit Form Fields, delete all columns except the following:
departmentId
departmentName
locationId - Check the Include Navigation Controls option.
- Click OK.
- In the Data Controls accordion, expand the HRFacadeBean > departmentsFindAll nodes. Drag the employeesList1 collection to the upper right facet in the visual editor (the Panel Collection.).
- In the Create pop up menu, select ADF Table.
- In the Edit Table Columns dialog, select Single Row, Enable Sorting and Enable Filtering. Select all the columns after salary (inclusive) and them.
- Move up lastName, firstName using the right side arrows.
- Multi select firstName and lastName and click the Group button.
- In the new row created on top, enter Name as the display label. Notice the indentation of firstName and lastName indicating that they are subcomponents of the Name group component.
- Click OK.
- Click the Emp tab in the page designer and from the Data Controls accordion, drag the employeesList1 to the Emp pane.
- Select the ADF Form menu option.
- In the Edit Table Columns dialog delete all columns except the following:
commissionPct,
email,
employeeId,
firstName,
hiredate,
jobId,
lastName,
phoneNumber,
salary,
and check the Include Submit Button checkbox. - Click OK.
- The page should now look like this:
- Click the Graph tab to switch pane. From the data control accordion, drag and drop employeesList1 onto the Graph pane.
- Select Graph from context.
- In the Component Gallery, choose the Bar category and select the Bar type and the first Quick Start layout.
- Click OK.
- In the Create Bar Graph page, drag and drop salary in the Bars field and firstName in the X Axis field.
- Click the Swap Bars with X Axis button to reorganize fields.
- Click OK.
- In the Properties window, for the Bar component, set the Appearance > ThreeDEffect property to true and the ShortDesc to Emps Salaries.
- Your page should now look like the following:
- Click the Save all


When you drag an item from the Data Controls panel and drop it on a page, JDeveloper performs a number of actions. It creates a DataBindings.cpx file in the default package for the project (if one does not already exist), and adds an entry for the page.
It creates the adfm.xml file in the META-INF directory. This file creates a registry for the DataBindings.cpx file, and is used by the applications metadata layer to allow customization and personalization of the application. It also adds a page definition file (if one does not already exist for the page) to the page definition subpackage. The default subpackage is view.pageDefs in the adfmsrc directory.
It creates the adfm.xml file in the META-INF directory. This file creates a registry for the DataBindings.cpx file, and is used by the applications metadata layer to allow customization and personalization of the application. It also adds a page definition file (if one does not already exist for the page) to the page definition subpackage. The default subpackage is view.pageDefs in the adfmsrc directory.


- In the page editor, right-click anywhere on the page and select Run.
- Wait for the page to upload in your default browser window. Once loaded, the page displays. Click the Next button to display a department having several employees. Notice the labels in the Dept form on the page. The form is using the labels that you set in the UI Hints.
- Notice that as you change department, employees change accordingly.In the Employees table, select another row, the employee detail should follow in the bottom pane.
- Click the Graph tab to display salary bars for the corresponding department.
- In the Employees table look for the salary column in the far right and move it next to the Name group.
- Click the Up arrow in the salary column to sort salaries in ascending order. Notice that the graph changes to reflect the new ordering criterion.
- Click the Emp tab to display the employee data and change the salary. (For example, change Karen Colmenares salary from 2500 to 5000). Click Submit.
- Click the Graph tab now and notice that the graph now reflects the new value. It is also displayed in the Employee's table above.
- Click the Emp tab again. Enter a salary that is less than 100 and click Submit. Notice that the validation that you entered is executed and the error message is displayed.. Change the value back to a valid value and click Submit again.
- In the menubar click the Detach button to isolate the Employee's table from the page context.
- Click the Detach button to return to the original display.
- In the menubar select View > Columns to display the columns that are currently active.
. - From the menubar select View > Reorder Columns and in the Reorder Columns dialog, using the up and down arrows experiment with moving columns around and then click OK.
- The new column order now appears in the Employees's table.
- Close your Browser window.


- Back in JDeveloper, in the Data Controls palette, expand the Operations node under departmentsFindAll, then drag and drop the Create operation in the Panel Group Layout facet of the Dept form.
- Select ADF Button from the context menu.
- Repeat the same operation with the Delete method.
- Under the HRFacadeBean node, drag and drop the persistDepartments(Departments) as an ADF Button between the Create and Delete buttons.
- In the Edit Action Binding dialog, click the down arrow in the Value field and select Show EL Expression Builder.
- In the Variables dialog, expand ADF Bindings > bindings > departmentsFindAllIterator > currentRow and select dataProvider.
- Click OK.
- Then click OK again.
- In the Properties window, type Persist in the Text field for the persistDepartments button.
- The Structure window and the Dept part of the page should look like the following:
- Right-click within the page and choose Run.
- In the Browser window, click the Create button to display an empty form.
- Type a new value for each of the fields (i.e. 400 - Stock - 1800).Click the Persist button to insert the new row in the department table.
- You can experiment adding new departments and navigating through the department records.
- Close the browser window and return to JDeveloper.


Part 3: Adding and Exposing a New Method to the UI
In this section you add a new method to the entity bean using the EJB annotation technique. You then expose the new method to the facade and use it as a data control for pages in a bounded task flow.
Additionally you use the task flow as a region within the mainHR page.
In the EJB, you add a named query using the @NamedQueries annotation syntax.
- Close all open tabs and expand the Model project.
- Double click the Employees.java class to open it in the Source editor.
- In the Source editor, expand (or open) the Entity node to visualize the @NamedQuery statement within the @NamedQueries annotation.")
- Add a comma after the closing parenthesis of the NamedQuery statement and hit Enter to add a new line.
- Add a query to the class that retrieves data about employees having a salary greater than a parameter value. Add the following statement:@NamedQuery(name = "Employees.findBySal", query = "select o from Employees o where o.salary > :p_sal")So that the code looks like the following:
@NamedQueries( {
@NamedQuery(name = "Employees.findAll", query = "select o from Employees o") ,
@NamedQuery(name = "Employees.findBySal", query = "select o from Employees o where o.salary > :p_sal")
})
If required, use the ALT + Enter keystroke combination to import the javax.persistence.NamedQueries library. - Click the Make icon to compile your project and check that no errors are returned.
- In the Applications Navigator, right-click HRFacadeBean.java and select Edit Session Facade from context.
- In the Specify Session Facade Options, check the new query you just added getEmployeesFindBySal() and Click OK.
This exposes the newly added, named query to be available as a data control. - Click the Save All
- Double click the DataControl.dcx and in the Data Control Registry, expand the HRFacadeBean node. Click the employeesFindBySal node and notice the existing attributes corresponding to the EJB JPA definition.
- Your new method is now ready to be used as a data control in your pages.
- Click the Save All


What makes these objects different from other Java files are the annotations that identify them as EJB entities. A key feature of EJB 3.0 and JPA is the ability to create entities that contain object-relational mappings by using metadata annotations rather than deployment descriptors as in earlier versions.

Named queries enable you to define queries at design time and then use them at run time. Creating the FacadeBean created one NamedQuery metadata statement in the Employee entity. This query retrieves all rows from the Employees table:
@NamedQueries({ @NamedQuery(name = "Employees.findAll", query = "select o from Employees o") })
@NamedQueries({ @NamedQuery(name = "Employees.findAll", query = "select o from Employees o") })

Any symbol in Java code beginning with @ is known as an annotation. The use of annotations allows you to add metadata to your objects. Examples of annotations follow:
| Annotation | Description |
|---|---|
| @Entity | Identifies the file as an EJB 3.0 entity |
| @NamedQuery | A query that can be used at run time to retrieve data |
| @Table | Specifies the primary table for the entity |
| @Id | Can define which property is the identifier for the entity |
| @Column | Specifies a mapped column for a persistent property or field |
| @ManyToOne | Specifies a type of foreign key relationship between tables |
| @JoinColumn | Specifies the join column and referenced column for a foreign key relationship |


ADF task flows provide a modular approach for defining control flow in a Fusion web application.
- In the Applications Navigator, collapse the Model project.. Right-click the ViewController project and select New > From Gallery.
- In the New Gallery, select Web Tier > JSF/Facelets as the Category and ADF Task Flow as the item. Click OK.
- In the Create Task Flow dialog, enter findBySalFlow.xml. Create as a bounded task flow with page fragments. Click OK.
- Drag a View component from the Components palette onto the task flow.
- Drag a second View component onto the task flow.
- Select the Control Flow Case component and click once in view1 to select the starting activity for the control flow case,the click in view2. Rename the flow find.
- Repeat the operation to create a second Control Flow Case from view2 to view1 and rename it back.
- Double-click view1 to create a page that will be associated with the view activity. In the Create ADF Page Fragment dialog,make sure that the Document type is Facelets and the Page Layout is Create Blank Page. Click OK to create the page.A page fragment is a JSF document that is rendered as content within another JSF page. Page fragments are typically used in bounded task flows that can be added to a JSF page as a region.
- Open the Data Controls pane and expand employeesFindBySal. Expand the Operations node and drag ExecuteWithParameters to the page and add it as an ADF Parameter Form.
- In the Create Form dialog, enter Salary in the Display Label field and click OK to accept other defaults.
- Select the ExecuteWithParameters button and in the Properties window, set the Action property to find from the list and type Find as the text.
- Save your work.
- Click the findBySalFlow.xml tab to reopen the task flow diagram. In the task flow diagram, double click view2 to create a page that is associated with the view2 view activity.
- In the Create ADF Page fragment, click OK to accept the default values.
- From the Data Controls palette, drag employeesFindBySal onto the page and select Table/List View--> ADF Table.
- In the Edit Table Columns dialog, select the Single Row , Enable Sorting, Enable Filtering, and Read-Only options Delete all columns after salary and also delete hiredate. Click OK to create the table.
- From the Components palette, select the Button component in the ADF Faces > General Controls library and drop it above the af:table node in the Structure window.
- In the Properties window, enter Back as Text and select back for the action.
- Click the Save All


There are two types of ADF task flows:
Unbounded task flow: A set of activities, control flow rules, and managed beans that interact to allow a user to complete a task. The unbounded task flow consists of all activities and control flows in an application, that are not included within a bounded task flow.
Unbounded task flow: A set of activities, control flow rules, and managed beans that interact to allow a user to complete a task. The unbounded task flow consists of all activities and control flows in an application, that are not included within a bounded task flow.
Bounded task flow: A specialized form of task flow that, in contrast to the unbounded task flow, has a single entry point (an entry point is a view activity that can be directly requested by a browser) and zero or more exit points. It contains its own set of private control flow rules, activities, and managed beans. A bounded task flow allows reuse, parameters, transaction management, reentry, and can render within an ADF region in a JSF page.
Create with Page Fragments: Clear this checkbox if you want the view activities that you add to the task flow to reference JSF pages that render in the main browser window as the root page. Leave the Create with Page Fragments checkbox checked if you want the view activities that you add to the task flow to reference page fragments files (.jsff) that the task flow displays in an ADF region at runtime.

Notice the circle around view1. It represents the entry point for the task flow.
A bounded task flow has a single point of entry, a default activity that executes before all other activities in the task flow.


You can render a bounded task flow in a JSF page or page fragment (.jsff) by using an ADF region.
- Double-click mainHR.jsf in the Applications Navigator to reopen the mainHR.jsf page.
- Right click the Graph tab and select Insert After Show Detail Item > Show Detail Item.
- In the Properties window, change the Text field to Search.
- In the Applications Navigator, expand Web Content > Page Flows and drag and drop the findBySalFlow.xml node within the Search pane.
- Select Create > Region from context.
- The page region should look like the following:
- Click the Save All


A primary reason for executing a bounded task flow as an ADF region is reuse. Read more...
You can isolate specific pieces of application functionality in a bounded task flow and an ADF region in order to reuse it throughout the application.
You can extract, configure, and package application functionality within a bounded task flow so that it can be added to other pages using an ADF region. ADF regions can be reused wherever needed, which means they are not dependent on a parent page.
Read more... You can isolate specific pieces of application functionality in a bounded task flow and an ADF region in order to reuse it throughout the application.
You can extract, configure, and package application functionality within a bounded task flow so that it can be added to other pages using an ADF region. ADF regions can be reused wherever needed, which means they are not dependent on a parent page.
- Right click within the page and select Run from context.
- In your Browser window, click the Search tab.
- Enter a value in the getEmployeesFindBySal_p_sal field (for example 8000) and click the Find button.
- A list of the corresponding employees is returned. Scroll right to verify that no salaries =< 8000 are returned.
- Click the Back button.
- Enter a new value in the getEmployeesFindBySal_p_sal field (for example 10000) and click the Find button.
- A more restricted list is now displayed.
- Close the browser window.


Part 4: Testing the Facade Inside and Outside the Java EE Container
In this section you add a new method to the entity bean using the EJB 3.0 annotation technique. You then test the new method by creating a facade client and running it.
To test your EJBs you need to run a client program that can create or find EJB instances and call their remote interface methods. JDeveloper provides a sample client utility that will help you create clients quickly. You can run and test EJBs using either the integrated server or a remote server;
- Click the Red button and select the IntegratedWebLogicServer to stop WebLogicServer.
- Collapse the ViewController project and expand the Model project.
- Double-click Employees.java to open the source code for the class and expand the @Entity node to display the hidden code.
- Add a comma at the end of the last @NamedQuery statement, then add a query to the class that retrieves employees by name. Add the following statement:@NamedQuery(name = "Employees.findByName", query = "select o from Employees o where o.firstName like :p_name")So that the code looks like the following:@Entity
@NamedQueries( {
@NamedQuery(name = "Employees.findAll", query = "select o from Employees o"),
@NamedQuery(name = "Employees.findBySal", query = "select o from Employees o where o.salary > :p_sal"),
@NamedQuery(name = "Employees.findByName", query = "select o from Employees o where o.firstName like :p_name")})What makes these objects different from other Java files are the annotations that identify them as EJB entities.
A key feature of EJB 3.0 and JPA is the ability to create entities that contain object-relational mappings by using metadata annotations rather than deployment descriptors as in earlier versions. - Click the Make icon to compile the Employees.java class.
Make sure that the Message - Log window does not report any errors. - Add the new method to the session bean as follows:Right-click the HRFacadeBean node in the Applications window and select Edit Session Facade from the context menu.
- Expand the Employees node of the dialog. Notice that the new named query getEmployeesFindByName appears as an exposable method. Select getEmployeesFindByName, deselect getEmployeesFindBySal and click OK.
- In the Applications window, right-click the HRFacadeBean.java and select New Sample Java Client...
- In the Create Sample Java Client pane, leave the values at their default and click OK.
- Two things need to be fixed.
First since the method uses a parameter, we need to add a value for the parameter.
In the code, scroll to the "/* FIXME: Pass parameters here */". In the getEmployeesFindByName method, add "p%" as the parameter. When you're finished, your code should look like the code below.
(List<Employees>) hRFacade.getEmployeesFindByName("p%") /* FIXME: Pass parameters here */) - Second, copy the following code and paste it at the end of the class.
Some import statements will also be included into your code
private static Context getInitialContext() throws NamingException {
Hashtable env = new Hashtable();
// WebLogic Server 10.x connection details
env.put( Context.INITIAL_CONTEXT_FACTORY, "weblogic.jndi.WLInitialContextFactory" );
env.put(Context.PROVIDER_URL, "t3://127.0.0.1:7101");
return new InitialContext( env );
} - Click the Save All
- Right click the HRFacadeBean in the Applications window and select Run from the context menu to launch the facade bean in WebLogicServer.
Wait until the WebLogicServer is started.The integrated Oracle WebLogic Server runs within JDeveloper. You can run and test EJBs quickly and easily using this server, and then deploy your EJBs with no changes to them. - Then, right click HRFacadeClient and select Run from context.
- To better display the results of the findByName() method, in the HRFacadeClient.java class, comment out the for loop corresponding to the getEmployeesFindAll() method, and comment out the for loop corresponding to the getDepartmentsFindAll() method. Your code should look something like this:
- Click the Make button
to recompile the class, and ensure that no errors are returned.
- Right click the HRFacadeClient class and select Run from context.
- The Log window should now display the returned rows retrieved by your ' P%' clause.

The server is stopped when you see the following message in the log window.


JDeveloper provides a way to test the EJB by creating a sample client. Normally, you would right click HRFacadeBean and select New Sample Java Client from the context menu. HOWEVER, due to a bug in the current version of JDeveloper, the option to generate a sample client from the context menu will not function properly. The following steps help you fix this problem. For more details on this issue, refer to the release notes..


The Log window returns the database data based on the three methods the client contains (getDepartmentsFindAll(), getEmployeesFindAll(), and getEmployeesFindByName().)


In this section, you create a session bean that implements a method to find employee and department records.
- Create a new persistence unit to run the java service outside the Java EE container.Right-click the META-INF > persistence.xml and select New Java Service Facade from the context menu.
- In the Java Service Class panel, you can choose to create a new persistence unit (in the next panel) or use an existing unit. Select Choose a Persistence Unit or Create one in the next Panel, check the Generate a Sample Java Client checkbox and click Next.
- Name the the Persistence Unit outside. Choose JDBC Connection and make sure the JDBC connection is set to HR. Click Next.
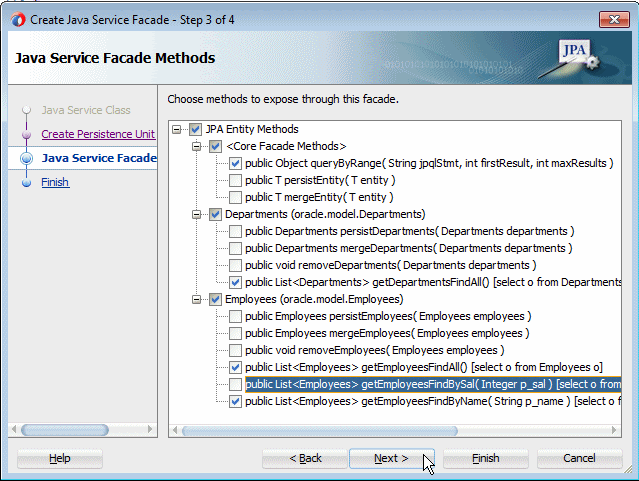
- All methods should be selected by default. Select only the following methods and click OK.
- In the source editor window, for the JavaServiceFacadeClient class, add "P%" as a parameter to the getEmployeesFindByName method so that the statement is:(List<Employees>)javaServiceFacade.getEmployeesFindByName("P%")
- Click the Make
- Right-click the JavaServiceFacadeClient node in the Applications window and select Run from context.
- The Log window displays the result of the execution of the class running outside Java EE container, returning the lastName of the first of the retrieved records (Pat Fay).
- Double-click the META-INF > persistence.xml node to display the contents of the file.
- The persistence editor opens showing the Model - Persistence Unit by default. Click the bread crumb navigation button to show both persistence units.
- Click the Source tab to show the code for both persistence units that have been created. The Model one and the outside one.


Click Next then Finish.


Summary
In this tutorial you discovered how to use EJB/JPA in a Web Application. You learned how to:- Build the data model with EJB 3.0 Using the EJB diagrammer
- Build the view project
- Add and expose a new method to the UI
- Test the facade bean inside and outside the Java EE container