Wednesday, July 27, 2016

Query to find out responsibility and request group for concurrent program


SELECT DISTINCT
  FCPL.USER_CONCURRENT_PROGRAM_NAME
, FCP.CONCURRENT_PROGRAM_NAME
, FAPP.APPLICATION_NAME
, FRG.REQUEST_GROUP_NAME
, FNRTL.RESPONSIBILITY_NAME
FROM
  APPS.FND_REQUEST_GROUPS FRG
, APPS.FND_APPLICATION_TL FAPP
, APPS.FND_REQUEST_GROUP_UNITS FRGU
, APPS.FND_CONCURRENT_PROGRAMS FCP
, APPS.FND_CONCURRENT_PROGRAMS_TL FCPL
, APPS.FND_RESPONSIBILITY FNR
, APPS.FND_RESPONSIBILITY_TL FNRTL
WHERE
FRG.APPLICATION_ID=fapp.APPLICATION_ID
AND FRG.APPLICATION_ID = FRGU.APPLICATION_ID
AND FRG.REQUEST_GROUP_ID = FRGU.REQUEST_GROUP_ID
AND FRG.REQUEST_GROUP_ID = FNR.REQUEST_GROUP_ID
AND FRG.APPLICATION_ID = FNR.APPLICATION_ID
AND FNR.RESPONSIBILITY_ID = FNRTL.RESPONSIBILITY_ID
AND FRGU.REQUEST_UNIT_ID = FCP.CONCURRENT_PROGRAM_ID
AND FRGU.UNIT_APPLICATION_ID = FCP.APPLICATION_ID
AND FCP.CONCURRENT_PROGRAM_ID = FCPL.CONCURRENT_PROGRAM_ID
AND FCPL.USER_CONCURRENT_PROGRAM_NAME LIKE :conc_prg_name
AND FNRTL.LANGUAGE = 'US'
AND FAPP.LANGUAGE = 'US';

Query For Getting The Sub Inventories for Inventory Item


select mi.secondary_inventory_name,mi.DESCRIPTION,ms.INVENTORY_ITEM_ID from mtl_secondary_inventories mi,MTL_SYSTEM_ITEMS_B ms
WHERE secondary_inventory_name IN( 'LA_FGI_L','LA_FGI_PLT','LA_FGI_U')
and mi.ORGANIZATION_ID=ms.ORGANIZATION_ID
and ms.INVENTORY_ITEM_ID='5245705'
and mi.organization_id = 4;

Relation between AR invoice and Sales Order


SELECT oha.order_number,
               ola.ordered_item item_name,
              ola.ordered_quantity * ola.unit_selling_price LINE_AMOUNT,
              rcta.trx_number Transaction_number, rcta.trx_date,
              rctla.line_number TRX_line_number,
               rctla.unit_selling_price unit_selling_price
  FROM oe_order_headers_all oha,
              oe_order_lines_all ola,
               ra_customer_trx_all rcta,
               ra_customer_trx_lines_all rctla
 WHERE oha.header_id = ola.header_id
   AND rcta.customer_trx_id = rctla.customer_trx_id
   AND rctla.interface_line_attribute6 = TO_CHAR (ola.line_id)
   AND rctla.interface_line_attribute1 = TO_CHAR (oha.order_number)

   AND oha.cust_po_number = :cust_po_number

Query To Get The Ship To Address By Order Number in Oracle Apps

SELECT DISTINCT LOC.ADDRESS1,LOC.ADDRESS2,HCSUA.LOCATION,H.ORDER_NUMBER,H.CUST_PO_NUMBER,HP.PARTY_NAME,HP.PARTY_NUMBER FROM 
OE_ORDER_HEADERS_ALL H,
HZ_LOCATIONS LOC,
HZ_PARTY_SITES HPS,
HZ_CUST_ACCT_SITES_ALL HCASA,
HZ_CUST_SITE_USES_ALL HCSUA,
HZ_PARTIES HP
WHERE H.SOLD_TO_ORG_ID=HCASA.CUST_ACCOUNT_ID
AND HCSUA.SITE_USE_ID=H.SHIP_TO_ORG_ID
AND LOC.LOCATION_ID=HPS.LOCATION_ID
AND HPS.PARTY_SITE_ID=HCASA.PARTY_SITE_ID
AND HCSUA.CUST_ACCT_SITE_ID=HCASA.CUST_ACCT_SITE_ID
AND HP.PARTY_ID=H.SOLD_TO_ORG_ID
AND H.ORDER_NUMBER='14565';


Tuesday, July 19, 2016

To get the request details by Request id

SELECT
user_concurrent_program_name,
responsibility_name,
request_date,
argument_text,
request_id,
phase_code,
status_code
FROM
fnd_concurrent_requests fcr,
fnd_concurrent_programs_tl fcp,
fnd_responsibility_tl fr,
fnd_user fu 
WHERE
fcr.concurrent_program_id = fcp.concurrent_program_id 
and fcr.responsibility_id = fr.responsibility_id 
and fcr.requested_by = fu.user_id
and request_id='27775711'
ORDER BY REQUEST_DATE DESC;

Monday, July 18, 2016

Open or Close Periods in R12

Purchasing Periods
1. Navigate to Purchasing SuperUser->Setup->Financials->Accounting->Control Purchasing Periods , then enter the Fiscal year and click Go button.
(If it prompts for selecting Operating Unit,select it and click Go button.)
2. Then open the periods by changing the Period Status and click on Save button.
Payables Period
1. Navigate to Payables Super User or Payable Manager->Accounting->Control Payables Periods , then open the periods by changing the Period Status and click on Save button.
General Ledger Periods
1. Navigate to General Ledger Super User->Setup->Open/Close, then the Ledger and click find.
2. Now open the required periods by clicking “Open Periods” button,select the required period as Target Period and click Open button.
Inventory Periods
1. Navigate to Inventory SuperUser->Accounting Close Cycle->Inventory Accounting Periods and select the Inventory Org from LOV.
2. Select the period to be opened and click on Change Status button.

Query to get DFF and SEGMENT values

SELECT ffv.descriptive_flexfield_name DFFName,
  ffv.application_table_name TableName,
  ffv.title Title,
  ap.application_name Application,
   att.column_seq_num SegmentNumber,
  att.form_left_prompt SegmentName,
  att.application_column_name ,
  fvs.flex_value_set_name ValueSet,
  att.required_flag
FROM apps.fnd_descriptive_flexs_vl ffv,
  apps.fnd_descr_flex_contexts_vl ffc,
  apps.fnd_descr_flex_col_usage_vl att,
  apps.fnd_flex_value_sets fvs,
  apps.fnd_application_vl ap
WHERE ffv.descriptive_flexfield_name = att.descriptive_flexfield_name
AND ap.application_id                =ffv.application_id
AND ffv.descriptive_flexfield_name   = ffc.descriptive_flexfield_name
AND ffv.application_id               = ffc.application_id
AND ffc.descriptive_flex_context_code=att.descriptive_flex_context_code
AND fvs.flex_value_set_id            =att.flex_value_set_id
AND ffv.title LIKE 'Additional Line Attribute Information';
--AND att.form_left_prompt LIKE '%VENDOR%';
ORDER BY att.column_seq_num;

Automatic Search External LOV

Automatic Search External LOV

In this lesson we are going to see how to Create Automatic Search using External LOV and the uses of external LOV in oaf. The difference between inline LOV and External LOV is inline lov is used only inside the page where as external LOV we can use for other pages inside the project.
So therefore the use or advantage of External LOV is if we want a list of values to be used for other pages in the project then we can create External LOV region and we can use the created region in any pages of the project.
Steps to create External LOV in oaf are follows:
Step1: Create Workspace, project , AM and create one page assign AM to the page give page title and window title.
For example :
workspace name : externlallov
Project Name : ExternallovPRJ
package name : externallov.oracle.apps.po.externallovprj.webui
AM name : ExternallovAM
AM Package name: externallov.oracle.apps.po.externallovprj.server
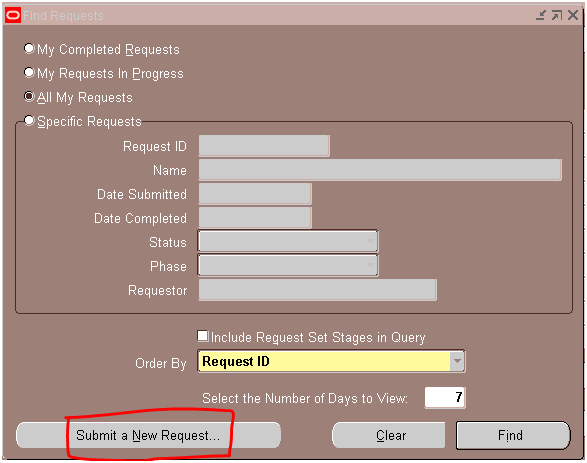
Step2: Right Click on the project select new as shown in the below picture.
15
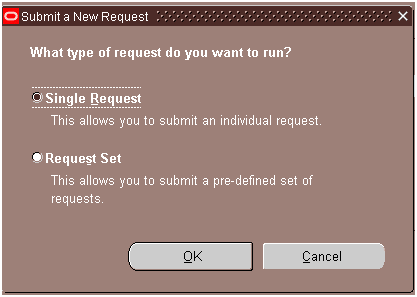
After selecting new option we will see a gallery window in that extract web tier in categories select OA Components  and then select Region  in items list.
16
After selecting region click on ok button so that a window will get open in that
Name : Give any user defined name
Package: Select the proper package of the project.
Style : select style as List of values.
 17
Now one .xml region will be created under webui.
Step3: Create on VO under the lov package for example select the package name as follows:
externallov.oracle.apps.po.externallovprj.lov.server
VO Name is : externalLOVVO
Query in the lov is :-
SELECT FULL_NAME FROM PER_ALL_PEOPLE_F
Step4: Attach VO to the AM.
Step5: Under the region create one item and item style as Message LOV input. In previous lesson we already seen how the Message LOV input item structure look like.
The below image shows how the Application Navigator and page structure of the project looks like:
18
Step6:  Under the Message LOV input region create on table region using wizard. In the table region select the proper package name and then as we attached our VO to the AM it will display our LOVVO so select that VO and therefore a table region will be created with one item under it.
Step7: Select the Message LOV input item and in the Property Inspector of Message LOV input select External LOV as shown in the below figure:
19
Click on the icon  87  so that the following window will get opens
20
Click on the Browse button and then select the proper package name for example see the below picture:
21
Click on the search button and then select the fully qualified name in the search results for example see the below picture:
22
Click on OK button so that JDeveloper asks for confirmation in that click on OK button.
23
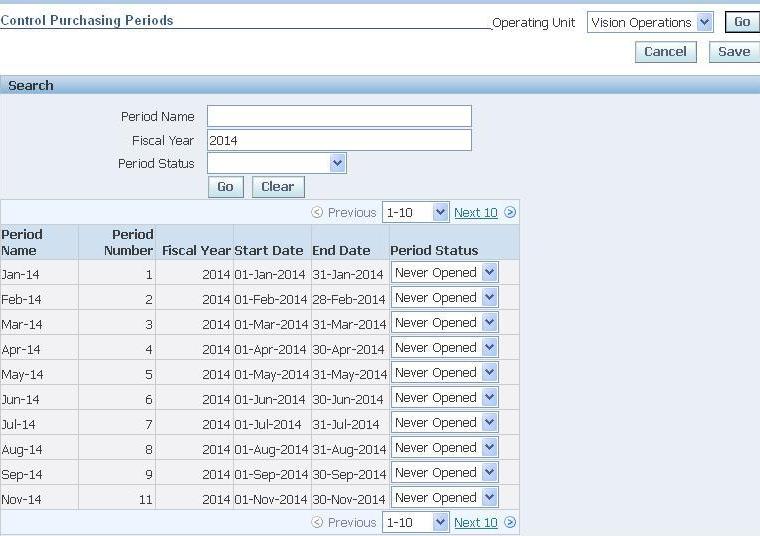
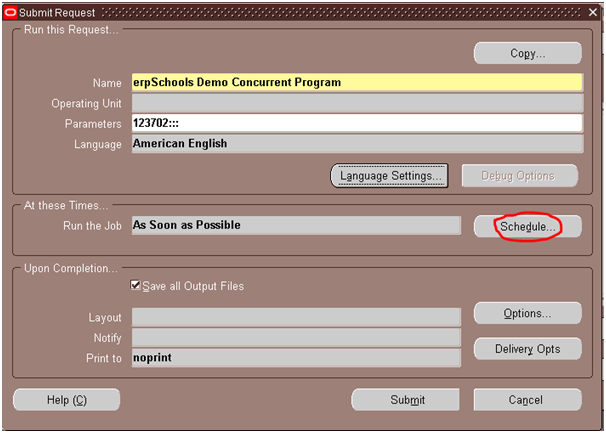
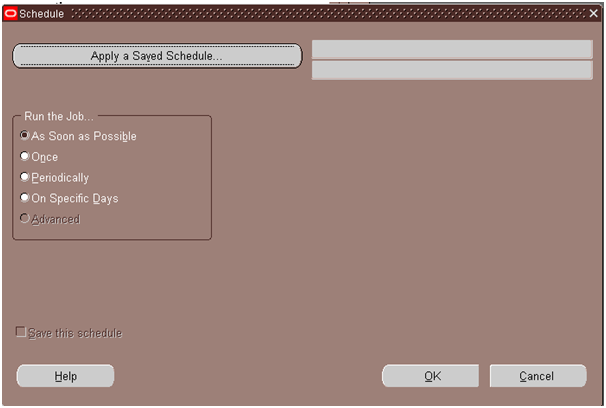
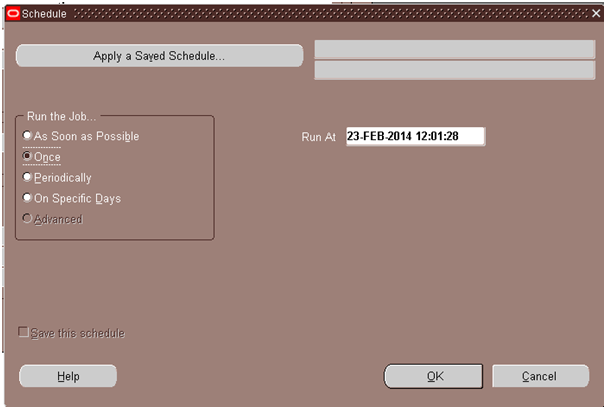
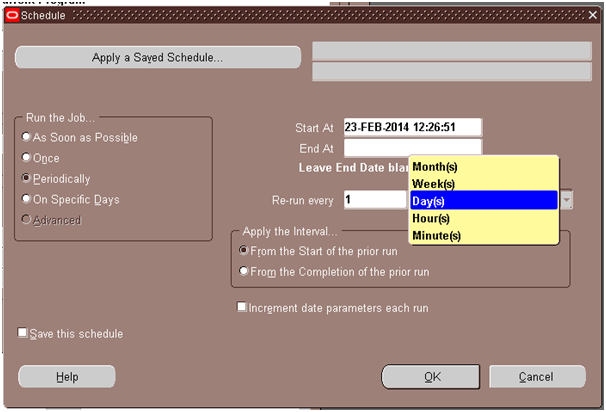
Step8: Run the page and see the output. The following three images shows the output and its work process
24
Click on the search image 12  so that it displays list of values as shown below.
25

Select any value whichever you want to select. Use Quick select or radio button process:
26

Friday, July 15, 2016

COUNT FUNCTIONALITIES IN SQL

count(*):

It selects all the columns in the table and then count the rows in a table

Example:select  count(*) from emp;

count(1):

It selects the first column from the table and then count the rows and including null values also.

Example:select  count(1) from emp;

count(column name):

It select the column and then count all the rows except null values

Example:select  count(empno) from emp;

count(distict column name):

It will count the rows in  column with distinct values

Example: select  count( distinct empno) from emp;

Scheduling concurrent program in Oracle Apps

Now let us see how we schedule a concurrent program in Oracle Apps.
1. Go to the respective responsibility where the concurrent program to be scheduled exists. Then go to View > Requests and click on “Submit a New Request”
Sch1
2. Select “Single Request” and click on OK button
Sch2
3. Enter the concurrent program name to be scheduled and the respective parameters and click on Schedule button
Sch3
4. This will open up the Schedule window.
Sch4
5. Schedule options: The below are the available scheduling options, we will see what they mean.
(i) As Soon as Possible: Selecting this option will kick off the concurrent program immediately.
(ii) Once: Selecting this option lets you specify at what time and date you want to kick off the concurrent program. The concurrent program will be submitted only once at the specified time and date.
Sch5
(iii) Periodically: Lets you schedule the program at the specified interval like once a month/week/day/hour/minute.
Sch6
Description of the fields and their importance:
Start At: Enter the date and time when you want to start the schedule
End At: Enter the end date for the schedule. Leaving this blank will run indefinitely.
Re-run every: Specify the interval you want to run like for example – every 1 day or every 2 months.
Apply the interval: How do you want to apply the interval from the start of the prior run or from the completion of the prior run.
Increment date parameters each run: Use this when one of the parameters for your program is a date.
If you check this, the date parameter will be incremented for each run.
If not checked, the date given in the parameter will not increment, it will remain the same as entered while scheduling for every run.
Apply a Saved Schedule: If more than one program has to be scheduled in a similar fashion, instead of entering the schedule details for each and every program, you can save the schedule and apply the same schedule for the remaining programs.
(iv) On Specific Days: Use this if you want to run the program for example on 5th day of every month or on Tuesday of every week,. This option lets you choose on what days of every month you want to run a program.
Sch7
6. Once you specify the interval/frequency you want the program to run, click on OK button. (I have set it to run once a day at 2:00 P.M starting from 23-Feb-2014 till 26-Feb-2014 as seen in the below screenshot)
Sch8
7. Click on Submit button.
Sch9
8. Upon querying for the request in the requests window, you see our program with status scheduled. When it’s time, the program will be executed.
Sch10
This is how you schedule a program to run at a specified frequency or interval.
9. At any point of time, if you need to change the schedule, you can select the scheduled request and click on View Details button
Sch11
Then click on Schedule button. Here you can change the schedule as per your wish.
Sch12
10. If you wish to cancel a scheduled request, select the request in the Requests window and click on Cancel Request in Requests window.
Sch13
This will prevent the program from running. If you see the below screenshot, status is cancelled.
Sch14

Wednesday, July 13, 2016

Implement External LOV in OA Framework

Implement External LOV in OA Framework
1. Create a New Workspace and Project
Right click Workspaces and click create new OAworkspace and name it as PRajkumarLovDemo. Automatically a new OA Project is also created. Name the project as LovDemo and package as prajkumar.oracle.apps.fnd.lovdemo

2. Create a New Application Module (AM)
Right Click on LovDemo > New > ADF Business Components > Application Module
Name -- LovAM
Package -- prajkumar.oracle.apps.fnd.lovdemo.server

3. Create a New View Object (VO)
Right click on LovDemo > New > ADF Business Components > View Object
Name -- LovVO
Package -- prajkumar.oracle.apps.fnd.lovdemo.server

Note - The VO is not based on any EO so click next and go to the query section and paste the query
SELECT          employee_number, full_name
FROM             per_all_people_f
WHERE           SYSDATE BETWEEN effective_start_date AND effective_end_date

4. Add View Object to Root UI Application Module

5. Create a New Page
Right click on LovDemo > New > Web Tier > OA Components > Page
Name -- LovPG
Package -- prajkumar.oracle.apps.fnd.lovdemo.webui

6. Select the LovPG and go to the strcuture pane where a default region has been created

7. Select region1 and set the following properties:  
ID -- PageLayoutRN
AM Definition -- prajkumar.oracle.apps.fnd.lovdemo.server.LovAM
Window Title -- List of values Demo Window
Title – List of values Demo

8. Right click PageLayoutRN and  click new Region
ID -- MainRN
Region Style – messageComponentLayout
Note - Style is given as messageComponentlayout because we are going to create only message components that is messageLovInput item in that region

9. Create a New Region
Right click on LovDemo > New > Web Tier > OA Components > Region
Name -- EmployeeLovRN
Package -- prajkumar.oracle.apps.fnd.lovdemo.webui
Region Style -- listOfValues
Scope -- Public

Note - The property Scope is the key property which makes the LOV region public and makes it usable in multiple pages

10. Select EmployeeLovRN. Right click on EmployeeLovRN in Structure pane and click table using wizard. In the wizard choose the prajkumar.oracle.apps.fnd.lovdemo.server.LovAM and select the LovVO1. Click Next
Region Id -- LovRN
Region style -- table

11. Shuttle the two attributes to the right side.That is EmployeeNumber and FullName

12. Click next, check the mapping and then finish

13. Select the field FullName and set the following properties:
Search Allowed -- True
Selective Search Criteria – True

Note - The first property lets users search on these values in the LOV, and the second property ensures that the users specify search criteria for at least one of these values to avoid a blind query

Attaching External LOV to Page:

14. Click on LovPG and right click the MainRN and click new messageLovInput
External Lov -- /prajkumar/oracle/apps/fnd/lovdemo/webui/EmployeeLovRN
Lov Region Item -- FullName
Return Item -- item1
Criteria Item -- item1
Prompt -- Employee Name

15. Congratulation you have successfully finished. Run Your page and Test Your Work 


Tuesday, July 12, 2016

Error: oracle.apps.fnd.framework.OAException: Application: FND, Message Name: FND_GENERIC_MESSAGE. Tokens: MESSAGE = java.lang.NullPointerException;
Solution :
Set profile “Sign-On:Notification” to “No” at site level.

OAF Errors and Resolutions

OAF Error

oracle.apps.fnd.framework.OAException: Application: ICX, Message Name: Could not find the specified responsibility. (Could not lookup message because there is no database connection)

Resolution

Check the following properties are set correctly.

Go to Project Settings. Expand Common and then Oracle Applications.

1) Database Connection 
  • Check if database setup is created.
2) Runtime conneciton 
  • DBC file name. ( this is the connection used when your run it . The database connection is only for the desing time)
  • Application short name such AK.
  • Responsiblity key
  • User name (Apps user name)
  • Password (Apps user password).
3) Check if responsibility(from responsibility key used above) is assigned to your apps user   
     name that is used in runtime connection.

Monday, July 11, 2016

About Controller

About Controller

  • Controller will take care of the web browser activities.
  • The controller manages the flow between pages.
  • Controller responds to the user actions and directs application flow.
  • The controller will request from HTTP get and HTTP post.
  • All the controllers end with the CO.
  • When we create controller on subclass will generate.
one
Controllers have three methods:
  1. Process Request (HTTP get).
  2. Process Form Request (HTTP post).
  3. Process Form Data.
HTTP get:This is used while loading the page.
HTTP post: After loading the page if we want changes.
Process Request: This method will handle HTTP get example while loading the page displaying the default items.
Process Form Request: This method will handle HTTP post.After loading the page if we want to perform any actions then we go for process form request.
Process Form Data: This page is invoked upon a browser ‘post’. During this phase the framework will automatically applies changes back to the underlying view objects. Rarely custom code is required in this phase. If exceptions are thrown during this phase the phase is skipped and the page redisplays with the error message.
There are two parameters in the controller:
1) OAPageContext
2) OAWebBean
OAPageContext:
  • To get and set values of the fields using the OAPageContext.getparatmeter and OAPageContext.putparameter.
  • To call one page to another page OAPageContext.setforwardURL.
  • To redirect the current page itself use OAPageContext.forwardImmediatelyToCurrentPage (or) OAPageContext.sendRedirect and many more.
OAWebBean:
  • Each and every field we have properties and the properties define the behavior of item.
  • OAWebBean represents the Hierarchy/Structure of the components in the page.
  • WebBean represents the properties of item.
As we discussed what Model, View, and Controller is, look at the below figure which shows that how they generally interact with each other or how the data flow between them is.
two

About View

About View

  • View is the actual output OAF page what an end user can able to see.

  • In Oracle Apps Framework View is implemented using UIX technology, whereas UIX means User Interface XML.

  • Whenever we run the page in JDeveloper then automatically UIX will generate web.xml file.

  • The power of UIX is that allows metadata to be translated to an HTML page for a web browser or mobile device browsers.

  • The generated web.xml file will be converted into HTML format of OAF page.

  • Since web.xml file here will work as a cache memory.

  • Whenever we want to move the web.xml file into the server side then MDS repository is used to move the web.xml file into the server.

  • MDS stands for Meta Data Service and in the application top we will be having MDS folder.

  • When we deploy all the OAF page destination paths, regions then the files will be stored into the MDS tables.

  • The MDS table are like:

JDR_Paths:Stores the path of the documents, OA Framework pages and their parent child relationship.
JDR_Components:Stores components on documents and OA Framework pages.
JDR_Attributes:Stores attributes of components on documents and OA Framework pages.
JDR_ATTRIBUTES_TRANS:Stores translated attribute values of document components or OA framework pages.
JDR_DOCUMENT_ID_S:  This is a sequence generator table.

  • MDS can be managed using standard database procedures and tools.

View Objects and View Links

View Objects and View Links

View Objects
  • View Objects are used where we want some data to be displayed on page.
  • View Objects are used just for displaying purpose.
  • View Objects access the result set of a SQL statement, it can be either based on the Entity Object or plain SQL query.
  • All the view objects ends with the VO
Example: employeeVO
  • When we create the View Object (VO) one subclass will generate with setters and getters method.entati2
We have four types of View Objects and they are:
1) Manual VO
2) Automatic VO
3) Validation VO
4) Property VO

Manual VO: If we are writing our own SQL query then it will be called as Manual VO.

Automatic VO: Automatic VO is when we select an Entity Object automatically it will select the Query.

Difference between Manual and Automatic VO is:

  •  If we want to perform DML operations then we can go for VO that should be based on Entity Object.
  •  We go for Manual VO if we are using simple SELECT statement.

NOTE: Note that when we create VO (View Object) all the table columns will be converted into attributes, hence here we call columns as attributes.

Validation VO:Validating the data in the Data Base, example using WHERE condition in the SELECT statement.
Property VO:Attributes / columns without Data Base columns comes under property VO. These attributes are also called as Transient attributes.

Example: Suppose there is a table which holds student marks so therefore it contains 6 columns to hold six subject marks for each student. There is no total column in the table to store the total marks of the student separately. Now in the output for display purpose we are taking TOTAL attribute hence which is not from Data Base table and this TOTAL attribute is called Transient attribute.

View Links
Relationship between two View Objects having one common column in both the VO’s is called View Link. All the View Link objects end with the VL
Example: DeptEmpVL
Note that if we want to display Master Detail data then we go for View Links, where as if we want to perform DML operations on Master Detail data we go for Entity Association.
The below figure shows that how View Objects and View Links are interacting with Data Base, VO interacts with Data Base Directly or VO interacts with Data Base through the EO.
view link

Oracle Fusion - Cost Lines and Expenditure Item link in Projects

SELECT   ccd.transaction_id,ex.expenditure_item_id,cacat.serial_number FROM fusion.CST_INV_TRANSACTIONS cit,   fusion.cst_cost_distribution_...