MANUAL SHIP CONFIRM PROCESS IN ORDER MANAGEMENT ORACLE EBS R12.2
MANUAL SHIP CONFIRM PROCESS IN ORDER MANAGEMENT ORACLE EBS R12.2
Concept: Once the pick release and pick confirm process is over, the details will be assigned to deliveries. Deliveries will be assigned to trips and trip is collections of stops.
- Below is the process flow in manual shipping process.
- Let’s discuss the complete process in detail below.
STEP 1: We are creating an Item in Master Organization and applying to the Inventory. Let’s increase the quantity of the material by taking miscellaneous receipt for an example.
Invoking: Inventory->Items->Master Items
- ITEM CREATED: Data card
- On Hand Quantity : 200
- Unit Price : $15
STEP 2: Now switch to the “Order Management Super User Responsibility”->Shipping Parameters uncheck the two check boxes “Auto create Deliveries” and “Auto Allocate” so that we can transact the move orders and manually view the shipping process.
STEP 3: Now let’s book a Normal sales order, just as below.
Invoking: Order Management Super User->Orders & Returns->Sales Order
In the above we have booked a sales order with six line items respectively.
STEP 4: Now we are going to release the Sales order
Invoking: Order Management Super User->Shipping->Release Sales Order->Release Sales Order
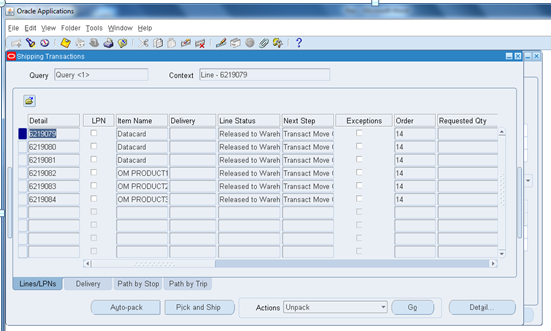
Let’s check the shipping transaction here.
Invoking: Order Management Super User->Shipping->Transactions
- Now here we can see that the line status of the shipping transaction is released to Warehouse with the next step as Transact move order with move order # generated if we scroll to right.
STEP 5: Let’s transact the move orders from switching the responsibility to Inventory.
Invoking: Inventory-> Move Orders->Transact Move Orders
Query by the Move order # and select the line, allocate and Transact as below.
If we check the sales order status it will be picked.
STEP 6: Now we are going to perform the below process manually.
- Delivery
- Path by Stop
- Path by Trip
The current status of the sales order is below:
PROCESS
|
LINE STATUS
|
DELIVERY STATUS
|
PATH BY STOP
|
PATH BY TRIP
|
SALES ORDER LINE STATUS
|
After Releasing the Sales Order/Transact Move order
|
Staged/Pick Confirmed
|
BLANK
|
BLANK
|
BLANK
|
PICKED
|
Now we are going to check each step in detail.
- In Shipping Transaction dialog box, select the Lines/LPNs Tab
- We can view the Line status as Staged/Pick Confirm; now select the lines for which the shipment has to be done by using Ctrl + Arrow.
- After selection click on Actions-> Auto Create Deliveries just as below.
- Now we can see that Delivery Tab is open after Auto Create Deliveries.
Here lets Ship confirm the order by removing the check box for the below.
- Set Delivery in Transit
- Close Trip
- Now if you re query the shipping transaction the Delivery status will be Confirmed just as below.
- Now the Pick by Stop Tab is displayed as below with open status with two activities “Awaiting Pickup” and “Awaiting drop off” which means the item has to be provoked to pick up and required to be delivered to the destination.
STEP 7: In order to provoke Pickup, select the Activity Awaiting Pickup and select update status from action so that you can close the pick up as below.
- Now if you witness, the Pickup activity is closed and simultaneously if you check the sales order status it will be displayed as Shipped, since the pickup process has been completed.
- Status at sales order level.
STEP 8: Similarly let’s complete the Awaiting drop off as well, by selecting the line items and choosing
Action->Update Status- >go as below.
- And “Path by Trip” shows the status as Closed and Activity as completed as below.
- Here everything is completed and the status of the sales order line is shipped.
STEP 8: Let’s run the Workflow Background process in order to change the status into “Awaiting invoice interface” so that it can be taken cared by Accounts Receivables from here.
- Now we have completed the manual Shipping process for the selected three items (Data card) of the sales order, similarly we can proceed for other three items (OM PRODUCT).
Now let’s have a clear view of different status of the order while performing Manual Shipping Process
MANUAL SHIPPING PROCESS DIFFERENT STATUS IN SHIPPING TRANSACTIONS:
SL NO
|
PROCESS
|
LINE STATUS
|
DELIVERY STATUS
|
PATH BY STOP
|
PATH BY TRIP
|
SALES ORDER LINE STATUS
| ||
STATUS
|
ACTIVITY
|
STATUS
|
ACTIVITY
| |||||
1
|
After Releasing the Sales Order/Transact Move order
|
Staged/Pick Confirmed
|
BLANK
|
BLANK
|
BLANK
|
BLANK
|
BLANK
|
PICKED
|
2
|
After Auto create Delivery
|
Staged/Pick Confirmed
|
Open
|
Open
|
BLANK
|
Open
|
BLANK
|
PICKED
|
3
|
After Ship Confirm Delivery
|
Staged/Pick Confirmed
|
Confirmed
|
Open
|
Awaiting Pickup
|
Open
|
Remaining
|
PICKED
|
Open
|
Awaiting Drop off
| |||||||
4
|
After path by stop” pickup” Closing
|
Interfaced
|
In-Transit
|
Closed
|
Picked up
|
In-Transit
|
On Board
|
Shipped
|
Open
|
Awaiting Drop off
| |||||||
5
|
After
” Awaiting Drop off” Closing
|
Interfaced
|
Closed
|
Closed
|
Picked up
|
Closed
|
Completed
|
Shipped
|
Closed
|
Dropped off
| |||||||
6
|
After Running Workflow Background
|
Interfaced
|
Closed
|
Closed
|
Picked up
|
Closed
|
Completed
|
Awaiting Invoice Interface - Incomplete Data/Closed
|
Closed
|
Dropped off
|
- This completes the illustration about manual shipping process concept.