Wednesday, July 27, 2016

Query To Get The Ship To Address By Order Number in Oracle Apps

SELECT DISTINCT LOC.ADDRESS1,LOC.ADDRESS2,HCSUA.LOCATION,H.ORDER_NUMBER,H.CUST_PO_NUMBER,HP.PARTY_NAME,HP.PARTY_NUMBER FROM 
OE_ORDER_HEADERS_ALL H,
HZ_LOCATIONS LOC,
HZ_PARTY_SITES HPS,
HZ_CUST_ACCT_SITES_ALL HCASA,
HZ_CUST_SITE_USES_ALL HCSUA,
HZ_PARTIES HP
WHERE H.SOLD_TO_ORG_ID=HCASA.CUST_ACCOUNT_ID
AND HCSUA.SITE_USE_ID=H.SHIP_TO_ORG_ID
AND LOC.LOCATION_ID=HPS.LOCATION_ID
AND HPS.PARTY_SITE_ID=HCASA.PARTY_SITE_ID
AND HCSUA.CUST_ACCT_SITE_ID=HCASA.CUST_ACCT_SITE_ID
AND HP.PARTY_ID=H.SOLD_TO_ORG_ID
AND H.ORDER_NUMBER='14565';


Tuesday, July 19, 2016

To get the request details by Request id

SELECT
user_concurrent_program_name,
responsibility_name,
request_date,
argument_text,
request_id,
phase_code,
status_code
FROM
fnd_concurrent_requests fcr,
fnd_concurrent_programs_tl fcp,
fnd_responsibility_tl fr,
fnd_user fu 
WHERE
fcr.concurrent_program_id = fcp.concurrent_program_id 
and fcr.responsibility_id = fr.responsibility_id 
and fcr.requested_by = fu.user_id
and request_id='27775711'
ORDER BY REQUEST_DATE DESC;

Monday, July 18, 2016

Open or Close Periods in R12

Purchasing Periods
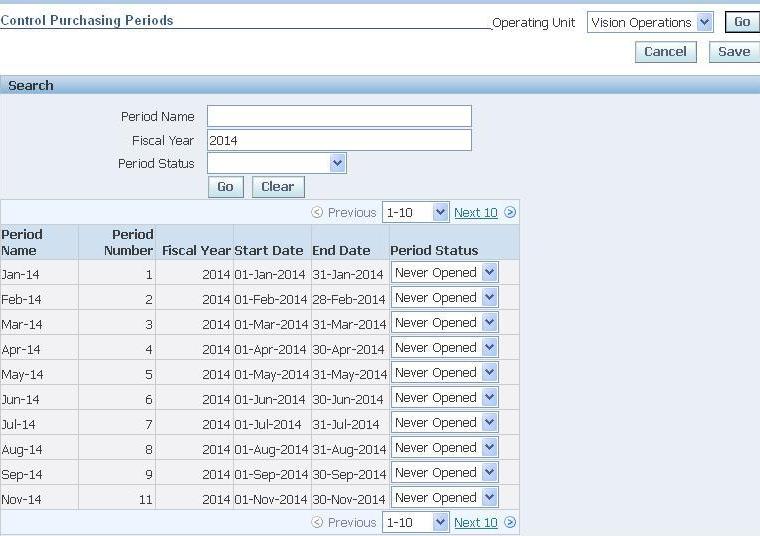
1. Navigate to Purchasing SuperUser->Setup->Financials->Accounting->Control Purchasing Periods , then enter the Fiscal year and click Go button.
(If it prompts for selecting Operating Unit,select it and click Go button.)
2. Then open the periods by changing the Period Status and click on Save button.
Payables Period
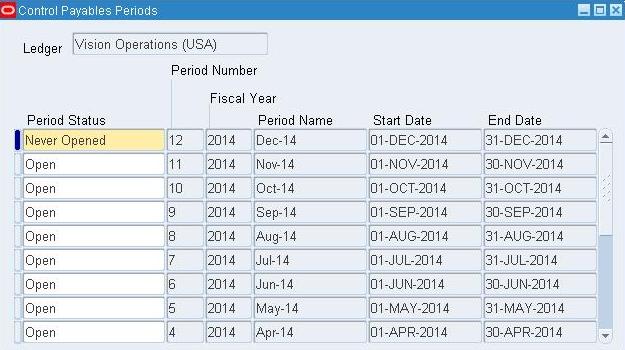
1. Navigate to Payables Super User or Payable Manager->Accounting->Control Payables Periods , then open the periods by changing the Period Status and click on Save button.
General Ledger Periods
1. Navigate to General Ledger Super User->Setup->Open/Close, then the Ledger and click find.
2. Now open the required periods by clicking “Open Periods” button,select the required period as Target Period and click Open button.
Inventory Periods
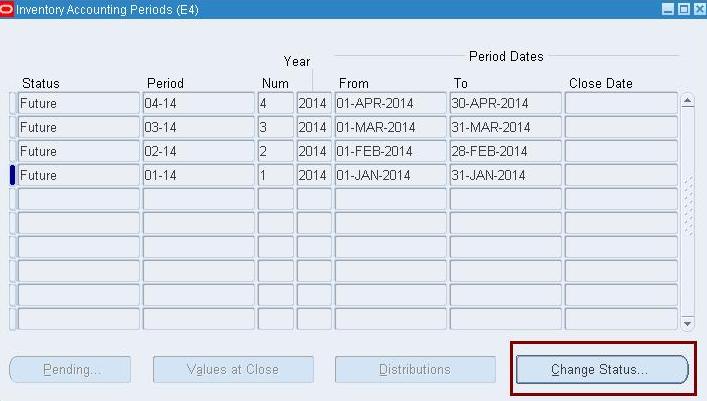
1. Navigate to Inventory SuperUser->Accounting Close Cycle->Inventory Accounting Periods and select the Inventory Org from LOV.
2. Select the period to be opened and click on Change Status button.

Query to get DFF and SEGMENT values

SELECT ffv.descriptive_flexfield_name DFFName,
  ffv.application_table_name TableName,
  ffv.title Title,
  ap.application_name Application,
   att.column_seq_num SegmentNumber,
  att.form_left_prompt SegmentName,
  att.application_column_name ,
  fvs.flex_value_set_name ValueSet,
  att.required_flag
FROM apps.fnd_descriptive_flexs_vl ffv,
  apps.fnd_descr_flex_contexts_vl ffc,
  apps.fnd_descr_flex_col_usage_vl att,
  apps.fnd_flex_value_sets fvs,
  apps.fnd_application_vl ap
WHERE ffv.descriptive_flexfield_name = att.descriptive_flexfield_name
AND ap.application_id                =ffv.application_id
AND ffv.descriptive_flexfield_name   = ffc.descriptive_flexfield_name
AND ffv.application_id               = ffc.application_id
AND ffc.descriptive_flex_context_code=att.descriptive_flex_context_code
AND fvs.flex_value_set_id            =att.flex_value_set_id
AND ffv.title LIKE 'Additional Line Attribute Information';
--AND att.form_left_prompt LIKE '%VENDOR%';
ORDER BY att.column_seq_num;

Automatic Search External LOV

Automatic Search External LOV

In this lesson we are going to see how to Create Automatic Search using External LOV and the uses of external LOV in oaf. The difference between inline LOV and External LOV is inline lov is used only inside the page where as external LOV we can use for other pages inside the project.
So therefore the use or advantage of External LOV is if we want a list of values to be used for other pages in the project then we can create External LOV region and we can use the created region in any pages of the project.
Steps to create External LOV in oaf are follows:
Step1: Create Workspace, project , AM and create one page assign AM to the page give page title and window title.
For example :
workspace name : externlallov
Project Name : ExternallovPRJ
package name : externallov.oracle.apps.po.externallovprj.webui
AM name : ExternallovAM
AM Package name: externallov.oracle.apps.po.externallovprj.server
Step2: Right Click on the project select new as shown in the below picture.
15
After selecting new option we will see a gallery window in that extract web tier in categories select OA Components  and then select Region  in items list.
16
After selecting region click on ok button so that a window will get open in that
Name : Give any user defined name
Package: Select the proper package of the project.
Style : select style as List of values.
 17
Now one .xml region will be created under webui.
Step3: Create on VO under the lov package for example select the package name as follows:
externallov.oracle.apps.po.externallovprj.lov.server
VO Name is : externalLOVVO
Query in the lov is :-
SELECT FULL_NAME FROM PER_ALL_PEOPLE_F
Step4: Attach VO to the AM.
Step5: Under the region create one item and item style as Message LOV input. In previous lesson we already seen how the Message LOV input item structure look like.
The below image shows how the Application Navigator and page structure of the project looks like:
18
Step6:  Under the Message LOV input region create on table region using wizard. In the table region select the proper package name and then as we attached our VO to the AM it will display our LOVVO so select that VO and therefore a table region will be created with one item under it.
Step7: Select the Message LOV input item and in the Property Inspector of Message LOV input select External LOV as shown in the below figure:
19
Click on the icon  87  so that the following window will get opens
20
Click on the Browse button and then select the proper package name for example see the below picture:
21
Click on the search button and then select the fully qualified name in the search results for example see the below picture:
22
Click on OK button so that JDeveloper asks for confirmation in that click on OK button.
23
Step8: Run the page and see the output. The following three images shows the output and its work process
24
Click on the search image 12  so that it displays list of values as shown below.
25

Select any value whichever you want to select. Use Quick select or radio button process:
26

Friday, July 15, 2016

COUNT FUNCTIONALITIES IN SQL

count(*):

It selects all the columns in the table and then count the rows in a table

Example:select  count(*) from emp;

count(1):

It selects the first column from the table and then count the rows and including null values also.

Example:select  count(1) from emp;

count(column name):

It select the column and then count all the rows except null values

Example:select  count(empno) from emp;

count(distict column name):

It will count the rows in  column with distinct values

Example: select  count( distinct empno) from emp;

Scheduling concurrent program in Oracle Apps

Now let us see how we schedule a concurrent program in Oracle Apps.
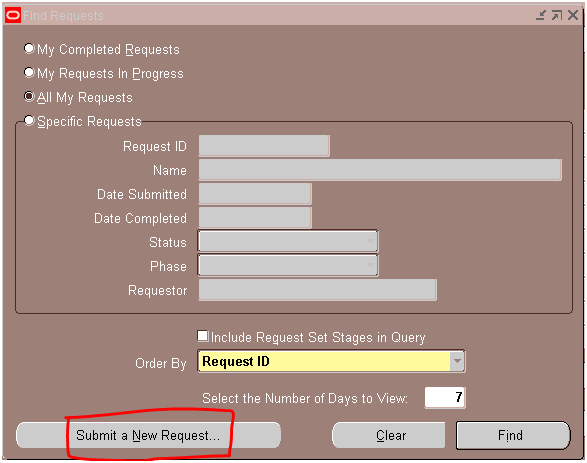
1. Go to the respective responsibility where the concurrent program to be scheduled exists. Then go to View > Requests and click on “Submit a New Request”
Sch1
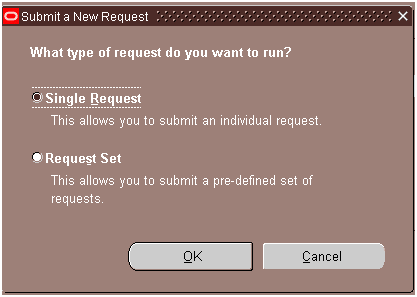
2. Select “Single Request” and click on OK button
Sch2
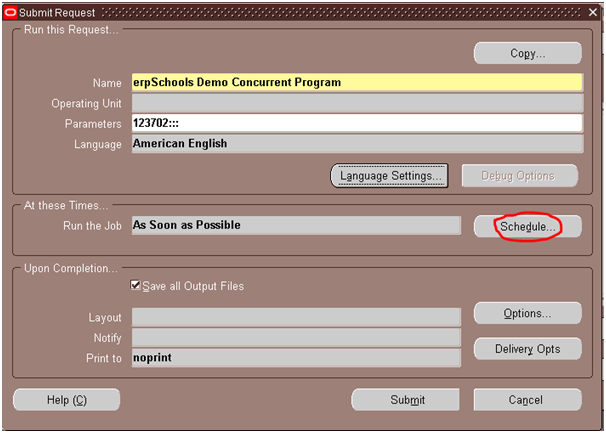
3. Enter the concurrent program name to be scheduled and the respective parameters and click on Schedule button
Sch3
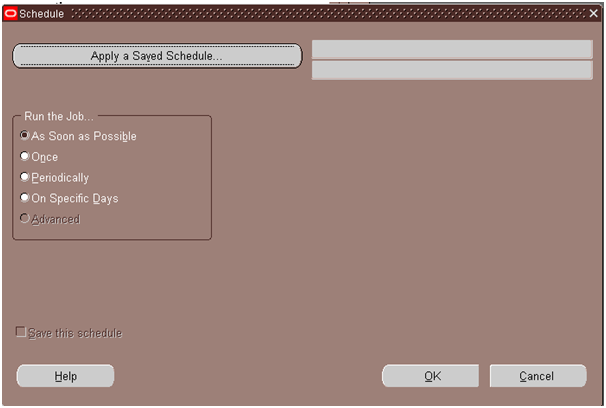
4. This will open up the Schedule window.
Sch4
5. Schedule options: The below are the available scheduling options, we will see what they mean.
(i) As Soon as Possible: Selecting this option will kick off the concurrent program immediately.
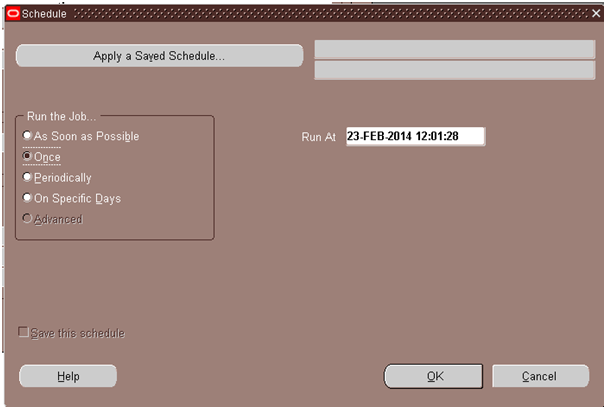
(ii) Once: Selecting this option lets you specify at what time and date you want to kick off the concurrent program. The concurrent program will be submitted only once at the specified time and date.
Sch5
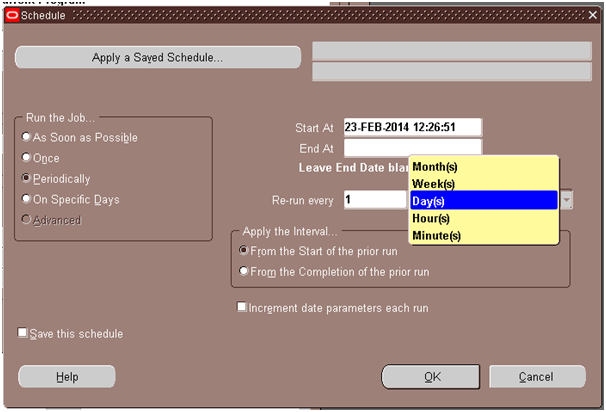
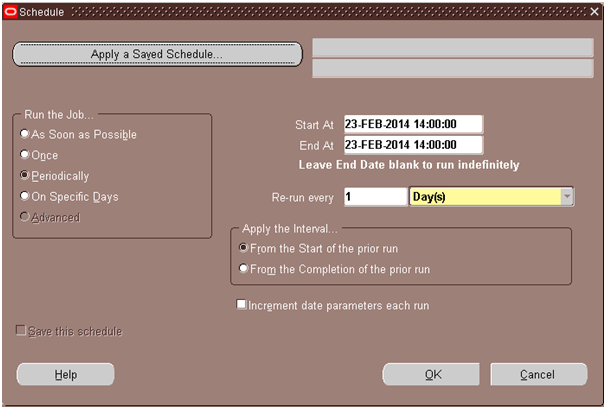
(iii) Periodically: Lets you schedule the program at the specified interval like once a month/week/day/hour/minute.
Sch6
Description of the fields and their importance:
Start At: Enter the date and time when you want to start the schedule
End At: Enter the end date for the schedule. Leaving this blank will run indefinitely.
Re-run every: Specify the interval you want to run like for example – every 1 day or every 2 months.
Apply the interval: How do you want to apply the interval from the start of the prior run or from the completion of the prior run.
Increment date parameters each run: Use this when one of the parameters for your program is a date.
If you check this, the date parameter will be incremented for each run.
If not checked, the date given in the parameter will not increment, it will remain the same as entered while scheduling for every run.
Apply a Saved Schedule: If more than one program has to be scheduled in a similar fashion, instead of entering the schedule details for each and every program, you can save the schedule and apply the same schedule for the remaining programs.
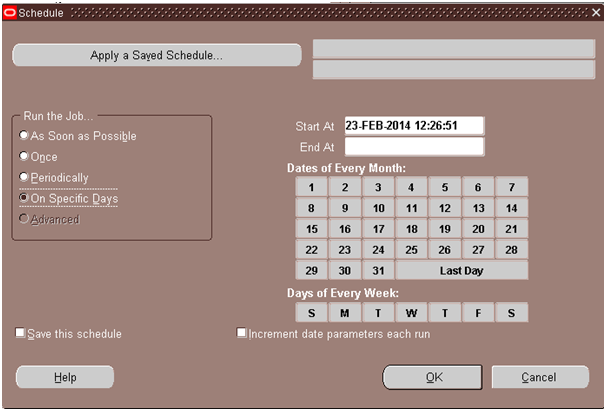
(iv) On Specific Days: Use this if you want to run the program for example on 5th day of every month or on Tuesday of every week,. This option lets you choose on what days of every month you want to run a program.
Sch7
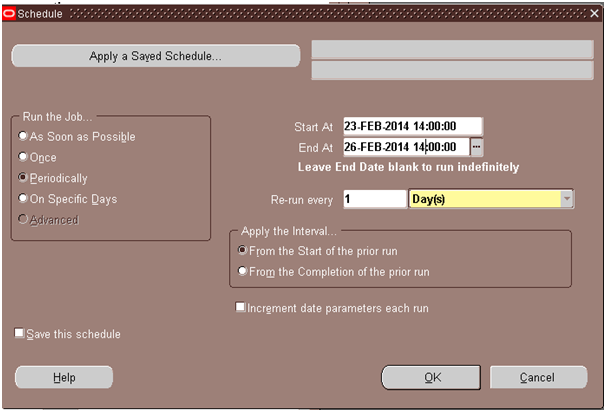
6. Once you specify the interval/frequency you want the program to run, click on OK button. (I have set it to run once a day at 2:00 P.M starting from 23-Feb-2014 till 26-Feb-2014 as seen in the below screenshot)
Sch8
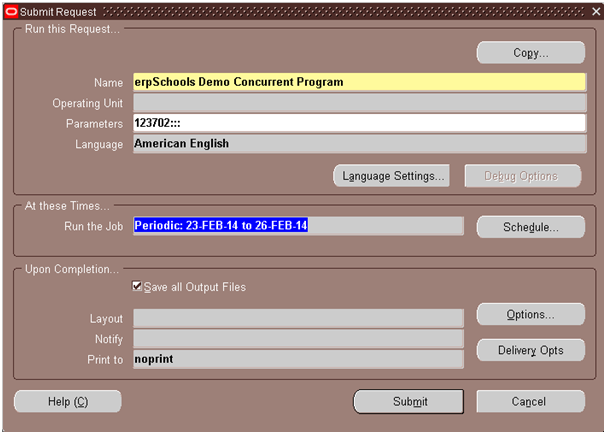
7. Click on Submit button.
Sch9
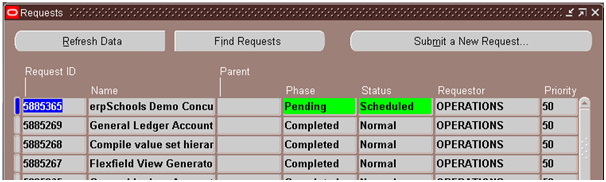
8. Upon querying for the request in the requests window, you see our program with status scheduled. When it’s time, the program will be executed.
Sch10
This is how you schedule a program to run at a specified frequency or interval.
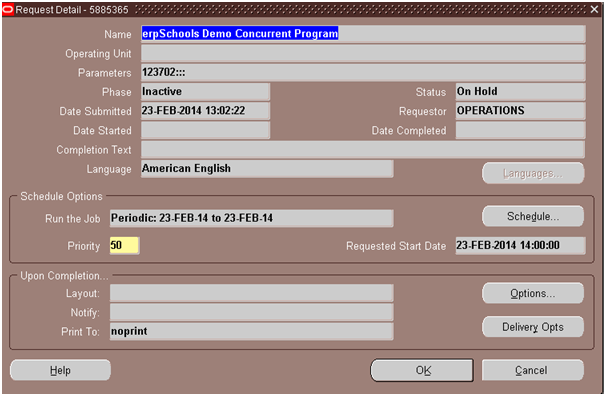
9. At any point of time, if you need to change the schedule, you can select the scheduled request and click on View Details button
Sch11
Then click on Schedule button. Here you can change the schedule as per your wish.
Sch12
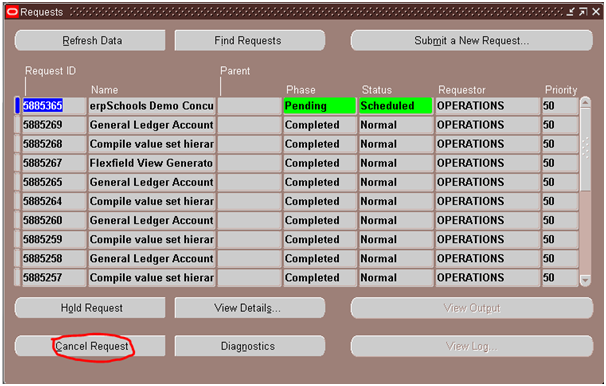
10. If you wish to cancel a scheduled request, select the request in the Requests window and click on Cancel Request in Requests window.
Sch13
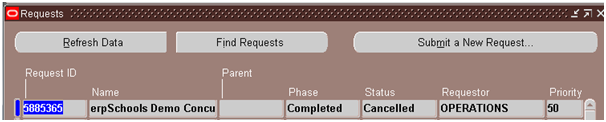
This will prevent the program from running. If you see the below screenshot, status is cancelled.
Sch14

Oracle Fusion - Cost Lines and Expenditure Item link in Projects

SELECT   ccd.transaction_id,ex.expenditure_item_id,cacat.serial_number FROM fusion.CST_INV_TRANSACTIONS cit,   fusion.cst_cost_distribution_...