Thursday, September 28, 2017

ABC of Workflow

a) ABC of Workflow

Oracle Workflow is unique in providing a workflow solution for both internal processes and business process coordination between applications. It automates and streamlines business processes both within and beyond our  enterprise, supporting traditional applications based workflow as well as e-business integration workflow. This technology enables modeling, automation, and continuous improvement of business processes, routing information of any type according to user-defined business rules. Oracle Workflow can route supporting information to each decision maker in a business process, including people both inside and outside our enterprise.

Oracle Workflow Builder is a graphical tool that help us  create, view, or modify a business process with simple drag and drop operations. Using the Workflow Builder,we can create and modify all workflow objects, including activities, item types, and messages etc.

Workflow Components
Depending on the Business process logic we may need to create/modify some or all of the of the following workflow process components.
Item Type
Item Type is a name/identifier of a workflow business process. Any component that we create for a workflow business process must be associated with a particular item type.
when we save our workflow process definition is database it takes the item type as its name. Opening an item type from databse automatically retrieves all the attributes, messages, lookups, notifications, functions and processes associated with that item type.
Example:- Here “Test Leave Workflow” is name of the Leave Approval business process .
Item Attribute
Item Attribute is nothing but global variable that can be accessed/ referenced by any activity within the itemtype. An item attribute often provides/stores information about an item that is necessary for the workflow process to complete. It also help us to share information with the stakeholders of a business process.
There are different types of item attribute:-

a)    Text:- The attribute value is a string of text
Note:- Oracle Workflow does not permit HTML content to be passed in attributes of type text. If Oracle Workflow encounters HTML tags in a text attribute, escape characters will be applied to display the content as plain text rather than executing the HTML.
b)    Number:- The attribute value is a number
c)    Date     :- The attribute value is a date    
d)    Lookup : -The attribute value is one of the lookup code values in a specified lookup type.
e)    Form    :- The attribute value is an Oracle Applications internal form function.
f)     URL    :-  The attribute value is a Universal Resource Locator (URL) to a network location. If we  reference a URL attribute in message attribute, the   
                     notification, when viewed from the Notification Details Web page or as an HTML-formatted e-mail, displays a link to the URL specified by the 
                     URL attribute.
g)    Document:- Document attribute is mainly used to attach document in notification and help stakeholder to see the information. This attribute mainly
                         used for external document integration purpose.The following document types can be used  :-               
                                                            >>  PL/SQL document
                                                            >>  PL/SQL CLOB Document
                                                            >>  PL/SQL BLOB Document
        
--- Other types of attributes will be explained later. To keep our discussion simple at this stage, the other attribute types are skipped intentionally.

Message & Notification Activity
In our daily life, when we plan to send a letter to anybody, first we write a letter and then we put that inside an envelope, which contain the address of the recipient.


In oracle workflow, Message can be compared with a letter and notification can be compared with envelope. In oracle workflow a message is attached with a notification.
Recipient of the message is known as performer. Here performer needs to be added at notification level, so that workflow engine can understand to whom the notification needs to be delivered.In performer field we need to add  a value(may be dynamic by adding item attribute),so that workflow uniquely identify the  recipient from database.(Username of FND_USER table).
Each message is associated with a particular item type. This allows the message to reference the item type's attributes for token replacement at runtime when the message is delivered. We can create a message with context-sensitive content (dynamic message body) by including message attribute tokens in the message subject and body that reference item type attributes.
Note:- Unlike the real life envelope-letter analogy, here we can attach only a single message(letter) to a notification(envelope).

Function Activity
 
Function Activity is defined by Pl/SQL stored procedure or other external procedure.Our discussion in oracle workflow will be restricted to Pl/SQL stored procedure only.
Function activity helps us to embed our custom business logic applicable to workflow business process.


Example:- We need to examine whether the person has applied for a leave for more than 10 days or less than equal to 10 days.

Conclusion:-
The Key features of Oracle Workflow are
i)The Workflow Engine embedded in the Oracle Database implements process definitions at runtime
ii) oracle uses the Business Event System which is an application service that uses the Oracle Advanced Queuing (AQ) infrastructure to communicate business 
    events between systems.

iii)The Workflow Definitions Loader is a utility program tightly integrated with the workflow builder and oracle application. This helps us to download workflow
   definition from database to flat file and upload it to database

iv)Oracle Workflow lets us include our own PL/SQL procedures or external functions as activities in our workflows. Without modifying our application code, you can
    have our own program run whenever the Workflow Engine detects that our program's prerequisites are satisfied.

v)The Notification System sends notifications to and processes responses from users in a workflow. Electronic notifications are routed to a role, which can be an
   individual user or a group of users. Any user associated with that role can act on the notification
.
vi)Electronic mail (e-mail) users can receive notifications of outstanding work items and can respond to those notifications using their e-mail application of choice.
   An e-mail notification can include an attachment that provides another means of responding to the notification.

vii)Web users can access a Notification Web page to see their outstanding work items, then navigate to additional pages to see more details or provide a response.

References:-additional  1) https://metalink.oracle.com
                                      2) Oracle Workflow Developer's Guide ( Release 12) B31433-04

Enabling access to Oracle Forms-based Applications Diagnostics Menu

Enabling access to Oracle Forms-based Applications Diagnostics Menu

The difference between the two screenshots below are that in one of them the the diagnostics menu and submenus are available while in the other they are not.
The diagnostics menu allows users to personalize Forms, generate trace file, examine items etc.  Access to the diagnostics menu and submenu are controlled by the profile option ‘Hide Diagnostics Menu Entry’ about which I had written in an earlier post. However, sometimes even after setting the profile option, users may encounter the message “Function not available to this responsibility. Change responsibilities or contact your System Administrator.” This is because, beginning with Release 12.1.3, access to the diagnostics submenu items can be controlled by the profile option ‘Utilities:Diagnostics’ or by security functions using Role-Based Access Control (RBAC). Whether or not a submenu item is available is checked on an as-needed basis by the system when the user selects the submenu item.
The following table lists the seeded securing functions and their corresponding diagnostics menu items. If the user wants to access the diagnostics menu items from a specific responsibility, adding the functions below to the menu attached to their responsibility would allow them to do so.
Securing Function NameSecuring Function User-Friendly NameInternal Menu NameRuntime Menu Name
FND_DIAGNOSTICS_EXAMINEFND Diagnostics Menu ExamineDIAGNOSTICS
  • EXAMINE
Diagnostics
  • Examine
FND_DIAGNOSTICS_EXAMINE_ROFND Diagnostics Menu Examine Read OnlyDIAGNOSTICS
  • EXAMINE
Diagnostics
  • Examine
FND_DIAGNOSTICS_TRACEFND Diagnostics TraceTRACE
  • NO_TRACE
  • REGULAR
  • BINDS
  • WAITS
  • BINDS_AND_WAITS
  • PLSQL_PROFILING
Diagnostics
  • No Trace
  • Regular Trace
  • Trace with Binds
  • Trace with Waits
  • Trace with Binds and Waits
  • PL/SQL Profiling
FND_DIAGNOSTICS_VALUESFND Diagnostics ValuesPROPERTIES_MENU
  • ITEM
  • FOLDER
Diagnostics – Properties
  • Item
  • Folder
FND_DIAGNOSTICS_VALUES_ROFND Diagnostics Values Read OnlyPROPERTIES_MENU
  • ITEM
  • FOLDER
Diagnostics – Properties
  • Item
  • Folder
FND_DIAGNOSTICS_CUSTOMFND Diagnostics CustomCUSTOM_CODE_MENU
  • NORMAL
  • OFF
  • CORE
  • SHOW_EVENTS
Diagnostics – Custom Code
  • Normal
  • Off
  • Core Code Only
  • Show Custom Events
FND_DIAGNOSTICS_PERSONALIZEFND Diagnostics PersonalizeCUSTOM_CODE_MENU
  • CUSTOMIZE
Diagnostics – Custom Code
  • Personalize
FND_DIAGNOSTICS_PERSONALIZE_ROFND Diagnostics Personalize Read OnlyCUSTOM_CODE_MENU
  • CUSTOMIZE
Diagnostics – Custom Code
  • Personalize
Adding the function ‘FND Diagnostics Personalize Read Only’ to the appropriate menu by navigating to System Administrator>Application>Menu, for example, will allow users to access a read-only version of the Form Personalization screen.
While adding the function ‘FND Diagnostics Personalize’ will allow users to access the normal Form Personalization screen.
In addition to securing functions, access to the diagnostics menu items can also be controlled by assigning permission sets to roles and then assigning the roles to users. The following table lists seeded permission sets.
Permission Set NamePermission Set CodePermissions Assigned
FND Diagnostics Examine MenuFND_DIAGNOSTICS_EXAMINE_PSFND Diagnostics Menu Examine
FND Diagnostics Examine Read OnlyFND_DIAGNOSTICS_EXAMINE_RO_PSFND Diagnostics Menu Examine Read Only
FND Diagnostics Custom MenuFND_DIAGNOSTICS_CUSTOM_PSFND Diagnostics Custom
FND Diagnostics Personalizations MenuFND_DIAGNOSTICS_FORMS_PERS_PSFND Diagnostics Personalize
FND Diagnostics Personalizations Menu Read OnlyFND_DIAGNOSTICS_FRM_PERS_RO_PSFND Diagnostics Personalize Read Only
FND Diagnostics Properties MenuFND_DIAGNOSTICS_PROPERTIES_PSFND Diagnostics Values
FND Diagnostics Properties Menu Read OnlyFND_DIAGNOSTICS_PROP_RO_PSFND Diagnostics Values Read Only
FND Diagnostics Trace MenuFND_DIAGNOSTICS_TRACE_PSFND Diagnostics Trace
FND Diagnostics Menu DeveloperFND_DIAGNOSTICS_DEVELOPER_PS
  • FND Diagnostics Examine
  • FND Diagnostics Personalize
  • FND Diagnostics Trace
  • FND Diagnostics Values
  • FND Diagnostics Custom
FND Diagnostics Menu SupportFND_DIAGNOSTICS_SUPPORT_PS
  • FND Diagnostics Examine Read Only
  • FND Diagnostics Personalize Read Only
  • FND Diagnostics Trace
  • FND Diagnostics Values Read Only
  • FND Diagnostics Custom
Source/further reading: Controlling Access to the Oracle Forms-based Applications Diagnostics Menu(Oracle E-Business Suite System Administrator’s Guide – Configuration)

Finding the name of a DFF in a seeded Form

The first step in enabling a Descriptive Flex Field (DFF) in a seeded Form is to find out the name of the DFF. Identifying a DFF involves the following steps:
1. Navigate to the Form which contains the DFF which needs to be identified. In this example, we will consider the Transactions Form under the Receivables Manager responsibility.
2. Click on the DFF and then go to Help>Diagnostics>Examine to open the  ‘Examine Field and Variable Values’ window, note down the Block and Field names.
3. In the ‘Examine Field and Variable Values’ window, select  $DESCRIPTIVE_FLEXFIELD$ as the Block and enter <BLOCK_NAME>.<FIELD_NAME> as the Field. <BLOCK_NAME> and <FIELD_NAME> are the values obtained in Step#2. Press the TAB key or click on the Value field. The name of the DFF will be displayed in the Value field along with the application under which it is registered.
4. You can now navigate to Application Developer>Flexfield>Descriptive>Register  and execute a query with the DFF name (obtained in Step#3) in the Title field to obtain the complete details of the DFF.

Dynamically enabling and disabling Concurrent Program Parameters

Dynamically enabling and disabling Concurrent Program Parameters

The first approach that might come immediatly to mind is to setup the three parameters ParamA, ParamB and ParamC in the manner and link them up using $FLEX$:
ParamA has value set VS1 attached to it. VS1 is of type Independent and has the values ‘ENABLE_B’ and ‘ENABLE_C’.
ParamB has value set VS2 attached to it. VS2 is of type Table and in the Where/Order By clause the condition :$FLEX$.ParamA=’ENABLE_B’ is added.
ParamC has value set VS3 attached to it. VS3 is of tye Table and in the Where/Order By clause the condition :$FLEX$.ParamA=’ENABLE_C’ is added.
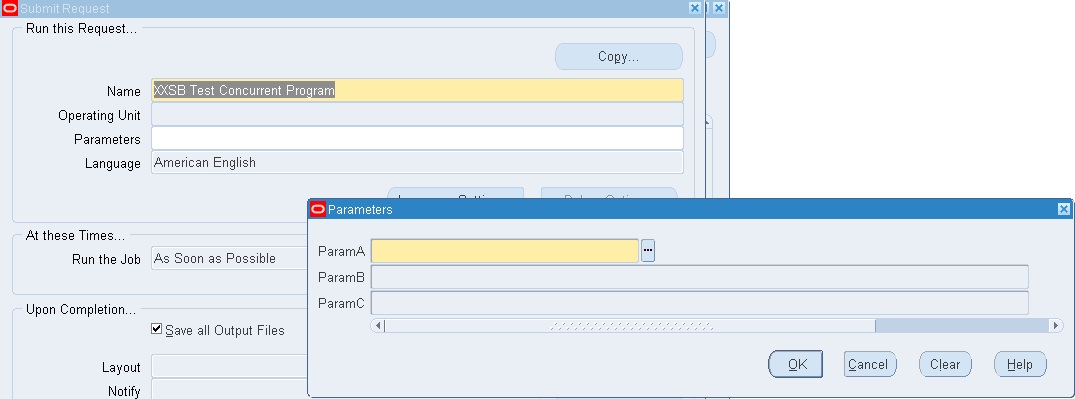
When the program is run, both parameters are initially disabled.
But the moment we select a value for the first parameter, ParamA, both ParamB and ParamC get enabled thus defeating our purpose. The only consolation, if it may be so called, is that the list of value for ParamC contains no values.
The correct approach is to use two additional dummy parameters to enable or disable the second and third parameters. We will look into this appoach in more details.
1. ParamA has value set XXSB1_VS1 attached to it. The value set XXSB1_VS1 is of type Independent and contains two values ‘ENABLE_B’ and ‘ENABLE_C’
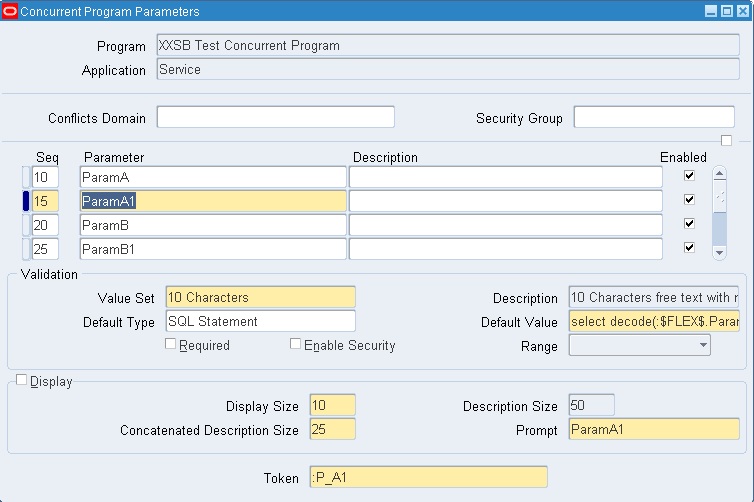
2. The dummy parameter ParamA1 has a seeded character value set attached to it. Note that the Displayed checkbox is unchecked. Its default value is derived from the SQL statement
1
select decode(:$FLEX$.ParamA,'ENABLE_B','Y', null) from dual
The value for this parameter will be ‘Y’ if ParamA has the value ‘ENABLE_B’ and null otherwise
3. ParamB has value set XXSB1_VS2 attached to it.
4. Value set XXSB1_VS2 is of type Table and in the Where/Order By clause the condition :$FLEX$.ParamA1=’Y’ is added
5. The dummy parameter ParamB1 has a seeded character value set attached to it. Note that the Displayed checkbox is unchecked. Its default value is derived from the SQL statement
1
select decode(:$FLEX$.ParamA,'ENABLE_C','Y', null) from dual
The value for this parameter will be ‘Y’ if ParamA has the value ‘ENABLE_C’ and null otherwise
6. ParamC has value set XXSB1_VS3 attached to it.
7. Value set XXSB1_VS3 is of type Table and in the Where/Order By clause the condition :$FLEX$.ParamB1=’Y’ is added.
That is it, all the parameters have now been set up. When the program is run, the second and third parameters are initially disabled like in the previous approach.
Depending on the value of the first parameter, the second and third parameters are enabled or disabled.
The second approach works while the first does not because the Where/Order By clause for one of the value sets always translates to null=’Y’ which cannot be equated and hence the parameter to which it is attached remains disabled.

Oracle Fusion - Cost Lines and Expenditure Item link in Projects

SELECT   ccd.transaction_id,ex.expenditure_item_id,cacat.serial_number FROM fusion.CST_INV_TRANSACTIONS cit,   fusion.cst_cost_distribution_...