Thursday, February 2, 2017

s

SELECT
  l.CUSTOMER_PO_NUMBER
l.GLOBAL_ATTRIBUTE2
FROM
  oe_headers_iface_all h,
  oe_lines_iface_all l
WHERE
  h.CUSTOMER_PO_NUMBER   =l.CUSTOMER_PO_NUMBER
AND h.sold_to_org_id     ='1296' --Customer_id of customer
AND l.GLOBAL_ATTRIBUTE2 IN('0078742087306','0078742088341') ;
 --+++++++++++++++++++++++++++++++

--For delete lines

DELETE
FROM
  oe_lines_iface_all
WHERE
  CUSTOMER_PO_NUMBER IN
  (
    SELECT
      l.CUSTOMER_PO_NUMBER
    FROM
      oe_headers_iface_all h,
      oe_lines_iface_all l
    WHERE
      h.CUSTOMER_PO_NUMBER =l.CUSTOMER_PO_NUMBER
    AND h.sold_to_org_id   ='1296'
  )
AND GLOBAL_ATTRIBUTE2 IN('0078742087306','0078742088341') ;  --place locations which are deleted.

Create Simple Search form in Oracle ADF

Create Simple Search form in Oracle ADF

1. Create a New Application
New > Applications > Fusion Web Application (ADF)
Application Name – SearchForm
Directory -- (Jdev install dir)/jdeveloper/(project name) 
Application Package Prefix – Demo.adf.searchform


2. Create Test Table and insert data some data in it (For Testing Purpose)
CREATE TABLE xx_search_demo
(    -- ---------------------
     -- Data Columns
     -- ---------------------
     column1                  VARCHAR2(100),
     column2                  VARCHAR2(100),
     -- ---------------------
     -- Who Columns
     -- ---------------------
     last_update_date   DATE          NOT NULL,
     last_updated_by    NUMBER   NOT NULL,
     creation_date          DATE          NOT NULL,
     created_by               NUMBER   NOT NULL,
     last_update_login  NUMBER
);
 

INSERT INTO xx_search_demo VALUES (‘val1’, ’val2’, SYSDATE, 0, SYSDATE, 0, 0);
INSERT INTO xx_search_demo VALUES (‘val3’, ’val4’, SYSDATE, 0, SYSDATE, 0, 0);
INSERT INTO xx_search_demo VALUES (‘val5’, ’val6’, SYSDATE, 0, SYSDATE, 0, 0); 


3. Create EO
Right Click on Model > New > ADF Business Components > Entity Object


Package -- Demo.adf.searchform.model.entities
Name – SearchEO
Schema Object – XX_SEARCH_DEMO
Note – By default ROWID will be the primary key if we will not make any column to be primary key in Attribute Settings Page  
Check the Accessors, Create Method, and Remove Method


Check Generate Default View Object CheckBox
Package – Demo.adf.searchform.model.queries
Name – SearchVO
 
Check Application Module CheckBox
Package – Demo.adf.searchform.model.services
Name – SearchAM


4. Define Bind Variables
Double Click on SearchVO in Model Project go to query page
Expand the Bind variable accordion and click on Green button


Bind Variable name and type as following make sure required check box is un-checked
Name – Col1
Type -- String
 
 
5. Create Named View Criteria
Double Click on SearchVO in Model Project go to query page. Expand the View Crriteria accordion and click on Green button
 
 
View Criteria is actually conditions on VOs which you usually define declaratively
     1.      Expand the View Critieria Section in SearchVO page and click the Green plus sign
     2.      Give a proper name to your View Criteria
          Criteria Name -- SearchVOCriteria
     3.      Click on Add Item
           Click the ( ) group press Add item and select values as sown in slide make sure you have selected the bind variable Col1
          Attribute – Column1
          Operator – Equals
          Operand – Bind Variable
          Parameter – Col1
          Un-check Ignore Case and Check Ignore Null Values
 
 
6. Create Search Form
Right Click on ViewController > New > Web Tier > JSF > JSF Page
File Name – Search
Initial Page Layout and Content – Quick Start Layout
Click on Browse and select One Column Stretched and check Apply Theme


Expand Page Implementation and Select Automatically Expose UI Components in a New Managed Bean
Select SearchVO and Expand the Data Control panel and Drag and drop the Named View Critieria “SearchVOCriteria” to the page
Choose Query > ADF Query Panel with Table as shown in the slide


The Page would look like this --
 
 
7. Refine Layout
Change the Header from “SearchEO” to “Search Demo”. To change select panel Header and change Text property to “Simple Search Demo”
 
Note - You can change form properties like Column names and page width as per your requirements
 
8. Congratulation you have successfully finished. Test Your Work Your Simple Search Form is Ready


Monday, January 30, 2017

Inventory Module Setup in Oracle EBS R12.


What is Oracle Inventory?
  • An Oracle Inventory Module  is a facility where you store and transact items. Before you can use Oracle Inventory, you must define one or more inventory organizations.
What is the need for Inventory Module in Oracle?
Oracle Inventory meets the following business needs of an organization:
  • Building the enterprise structure
  • Creating item numbers
  • Monitoring inventory on an ongoing basis
  • Maintaining accurate on-hand balances
  • Planning material replenishments
  • Forecating demand

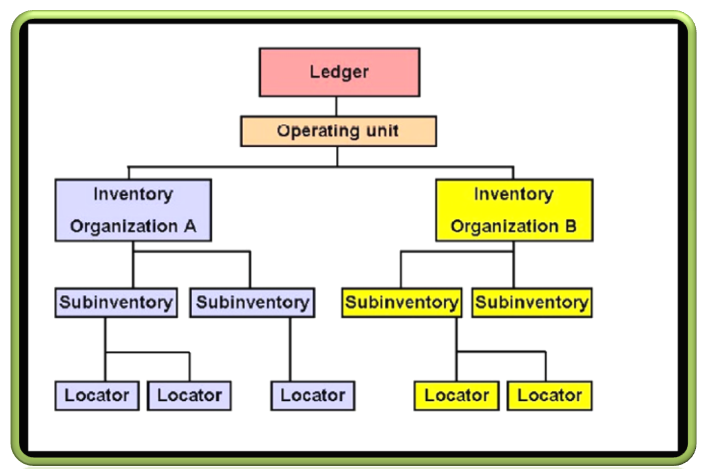
A simple Inventory Organization structure is below for reference:


  • Lets see the setup procedure in detail by following the below summary.
SUMMARY:
  • Adding inventory responibility to the Buisness Group
  • Enabling Profile Options
  • Defining Locations, working calenders
  • Creating Master Org, Inventory Org
  • Creating Sub Inventories
  • Creating Locators for the subinventories
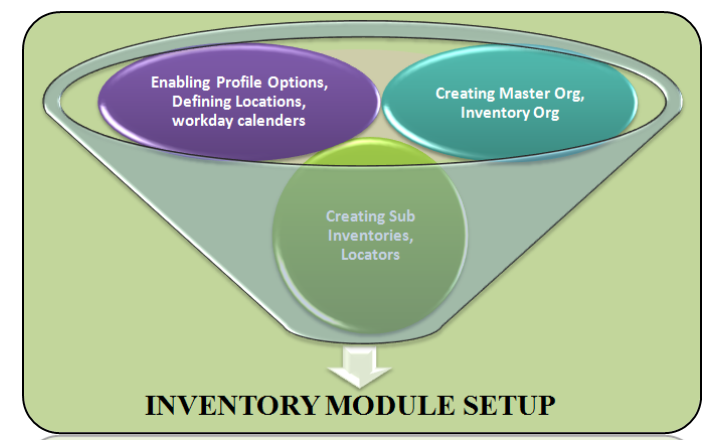
Below basket of funtions has to be enabled to fullfill Inventory module setups in short.
Before going head make sure you have completed the multiorg structure properly with Buisness Group, General Ledger, Operating Unit.
For the below setup,
  • Buisness Group/User : IPHONE
  • General Ledger : IPHONE LED
  • Operating Unit: IPHONE 5


STEP 1: Adding inventory responibility to the Buisness Group
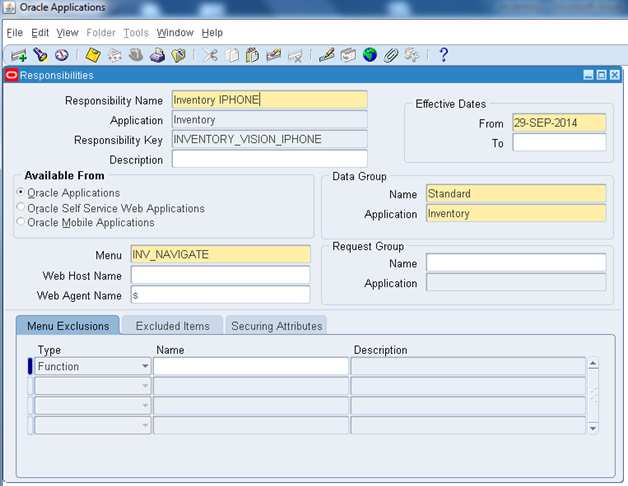
Invoking : System Administrator→Security→Responsibility→Define
  • Press F11 and query for Inventory, Vision Operations (USA) and rename to your wish.

  • Now add the responsibility to the user,
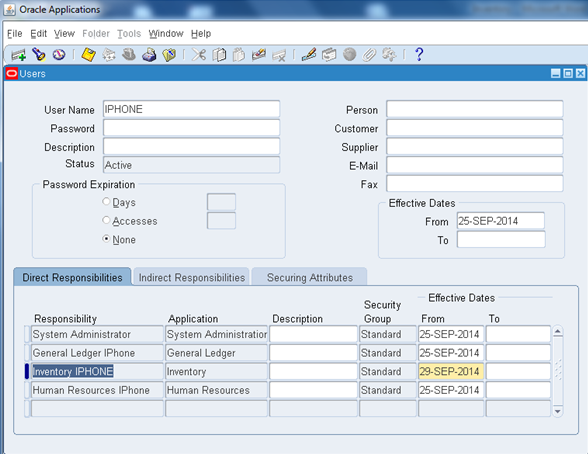
Invoking : System Administrator→Security→User→Define
  • Query for your user and add the Inventory responsibility.

STEP 2: Enabling Profile Options
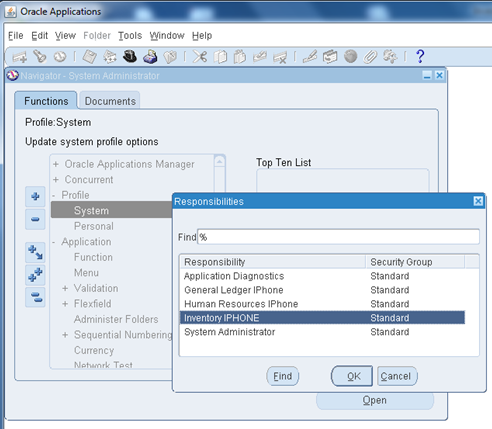
  • Lets enable the profile options for the inventory responsibility.
Invoking: System Administrator→Profile→System

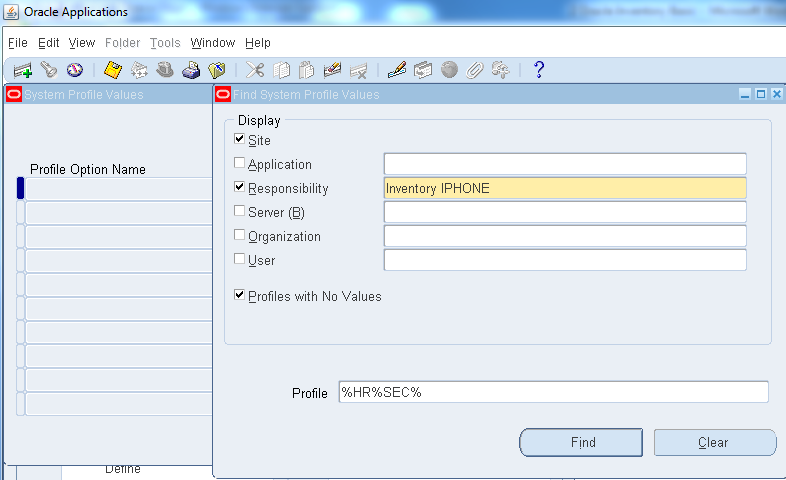
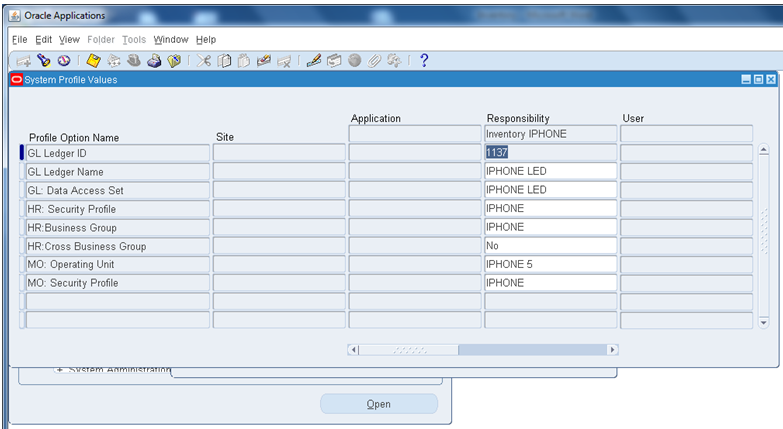
In Profile field enter these features:
  • %GL%Led%NA%
  • %HR%User%, %HR%Sec%, %HR%Bus%
  • %MO%Oper%Unit%,  %MO%Defaul %, %MO%Sec%

So that the final output will appear as below.


STEP 3: Defining Locations, Workday Calender

  • Now Login to Inventory Responsibility,


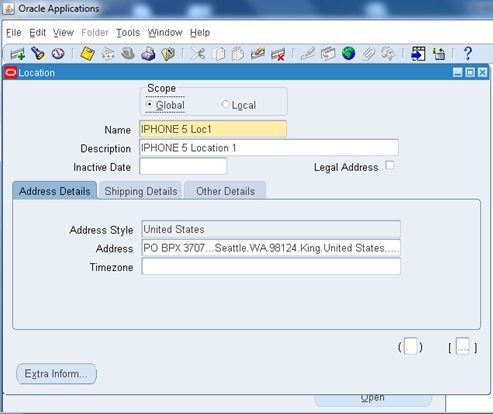
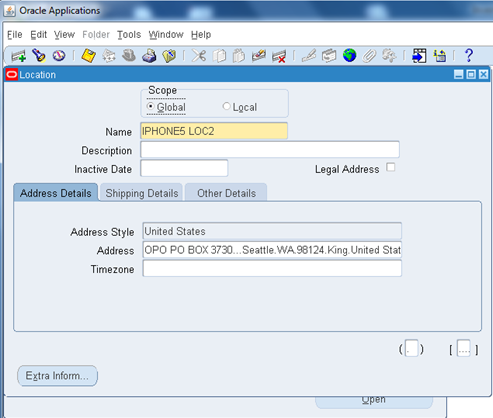
  • Lets create two locations for 2 different Inventory org locations, one for Master Org Inventory & other for Inventory, under the Operating Unit IPHONE5
Invoking: Inventory→Setup→Organization→Location

First Location Name: IPHONE 5 Loc1


Second Location Name : IPHONE5 LOC2


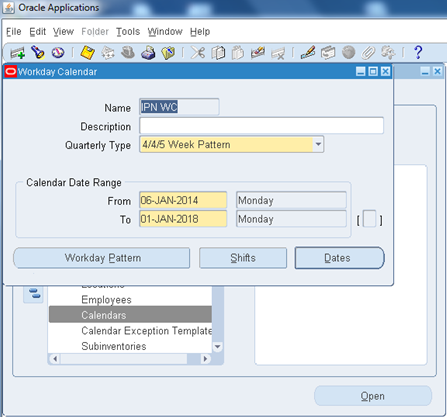
  • Now lets create workday calender
Invoking: Inventory→Setup→Organization→Calender
  • We have created Workday Calender with name IPN WC, Complete the workday pattern, shifts, dates accordingly as per Buisness Standards.
  • On the same page of Workday Calender,
Select Tool→Biuld→Calender(To update the calender we created)


  • Now we are done with creating location for inventories & Workday Calender, lets attach both while creating Inventory Organizations.

STEP 4: Creating Master Org, Inventory Org
  • Before creating Inventory org its mandatory to create a master org.
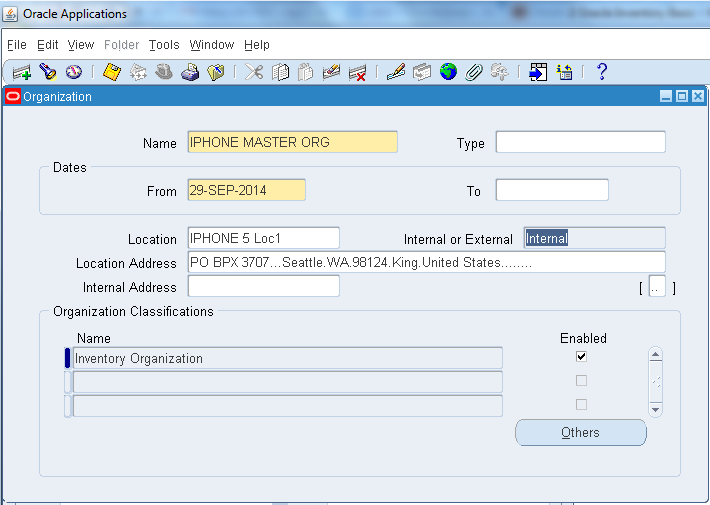
Invoking: Inventory→Setup→Organization→Organization
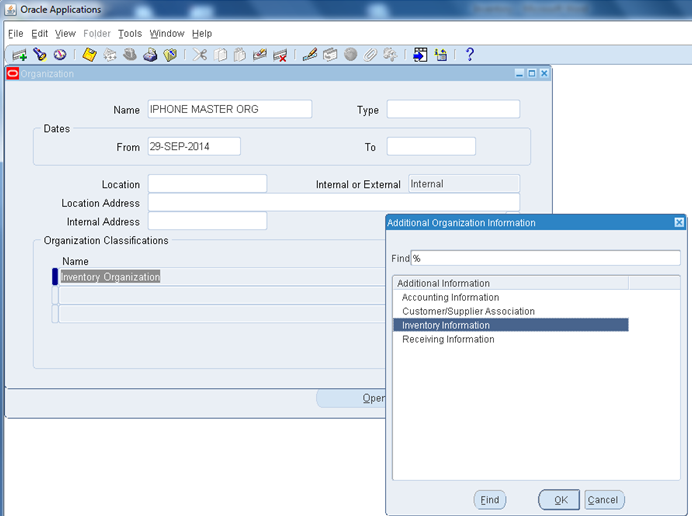
  • Lets create a Master Org with the name IPHONE MASTER ORG
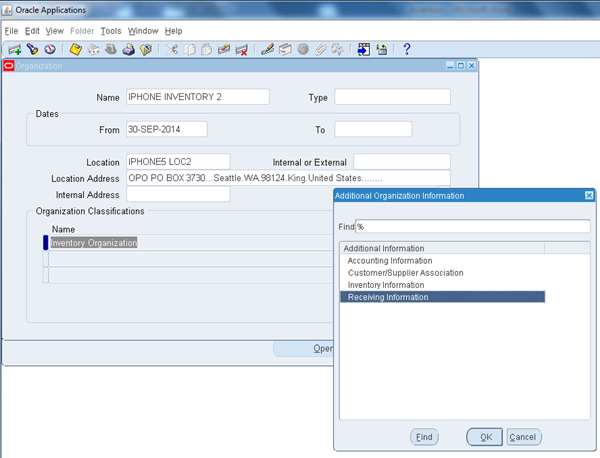
  • Add the funtion Inventory Organization under name and check the Enabled option as below.
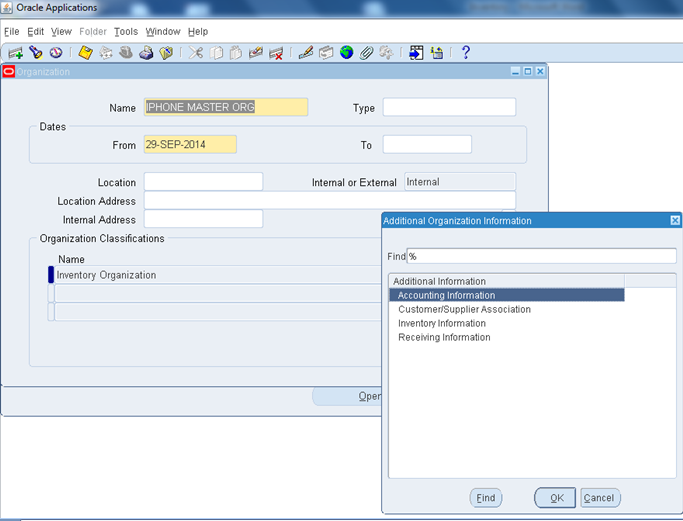
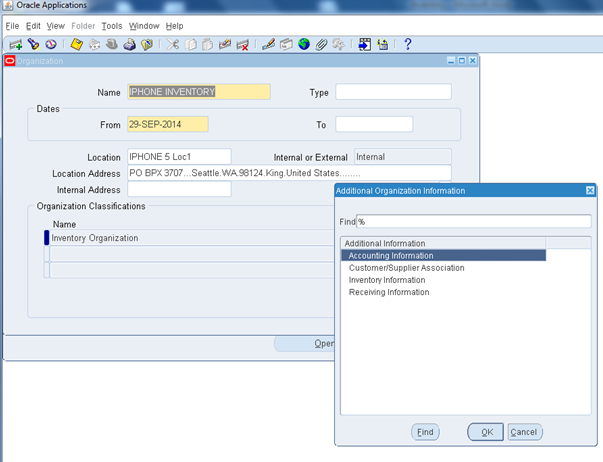
  • Click on others, below pop up window opens


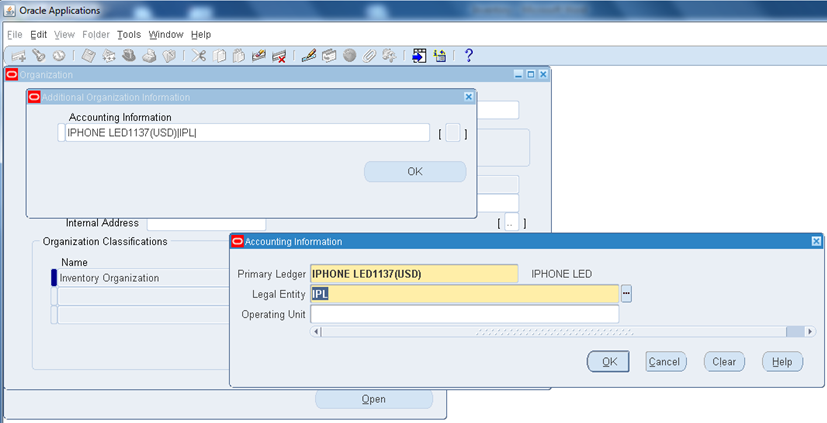
  • Lets update Accounting Information, Inventory Information alone for Master Org.

Click on Accounting information from above.
  • Fill Primary Ledger : IPHONE LED1137(USD) (Created Before)
  • Legal Entity : IPL(Created Before)
  • Operating Unit : no need for Master Org

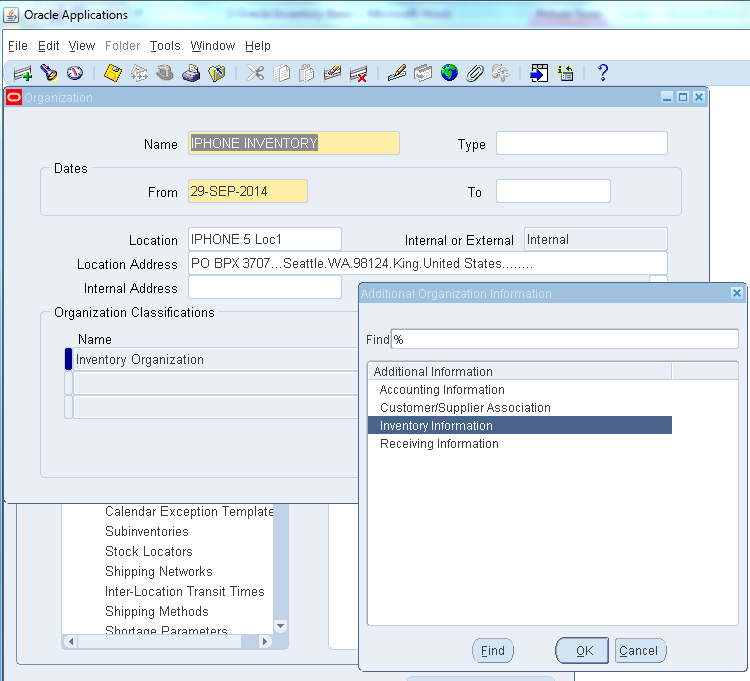
  • After updating click on others again, select Inventory Information as below.


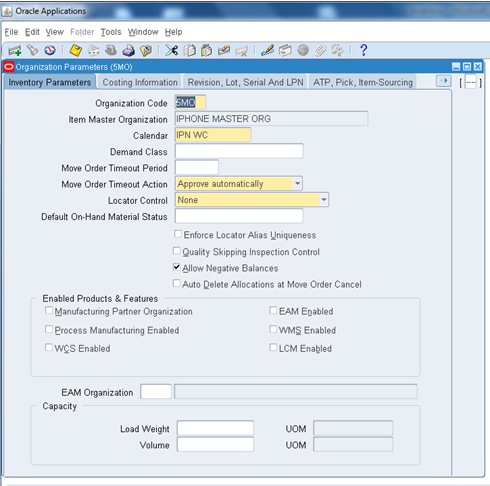
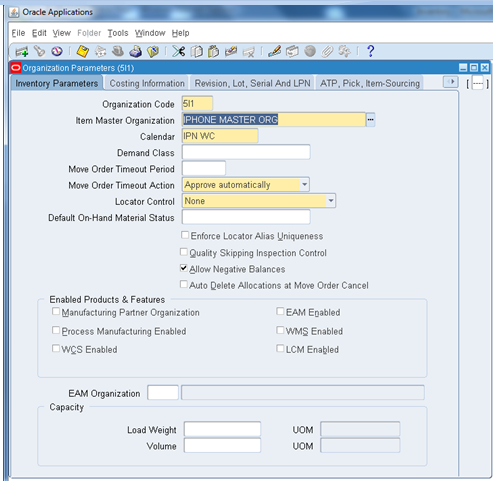
  • Inventory information is very important and we have to fill carefully all the mandatory fields as below.
  • Organization code 5MO (Our Choice) is just an unique code given by us.
  • Calender: we are pasting the workday calender (IPN WC) which we created before.
  • Item Master Organization acts as a server or Admin or Master for all inventories under specific Operating unit.
  • Here We have updated IPHONE MASTER ORG as Item Master Org as below.

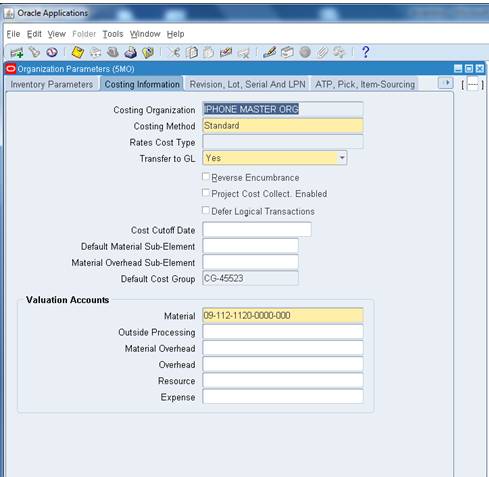
  • In Costing Information below we have updated IPHONE MASTER ORG that we created and the account 09 that we set before for legal entity.


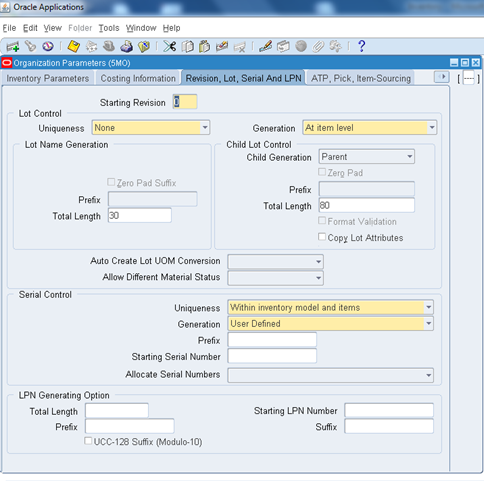
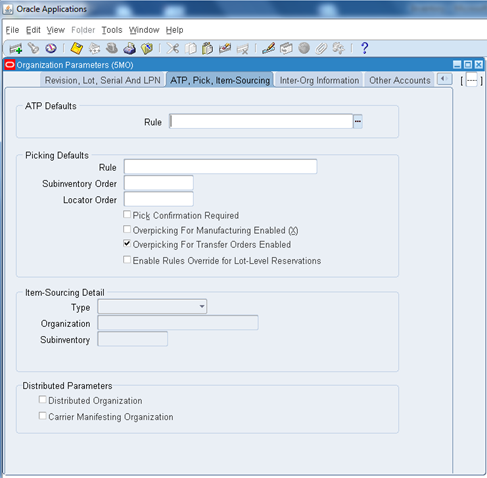
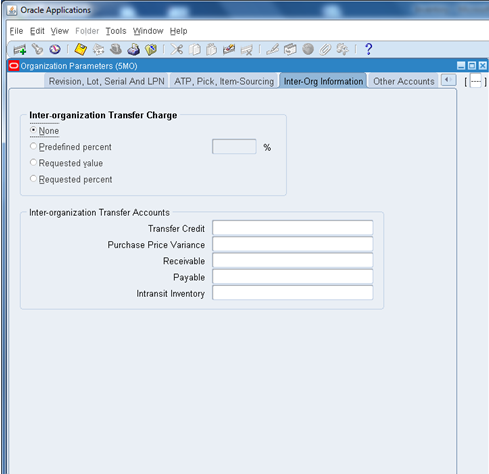
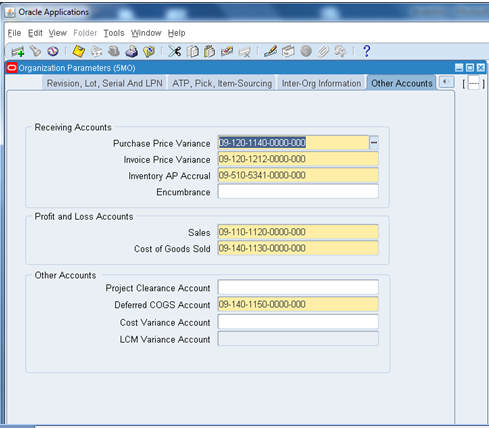
  • For all other tabs follow the below screenshots correspondingly.


  • After filling all the mandatory fields save the dialog box, which completes Master Org.


             Now Create a new Inventory as below.
Invoking: Inventory→Setup→Organization→Organization
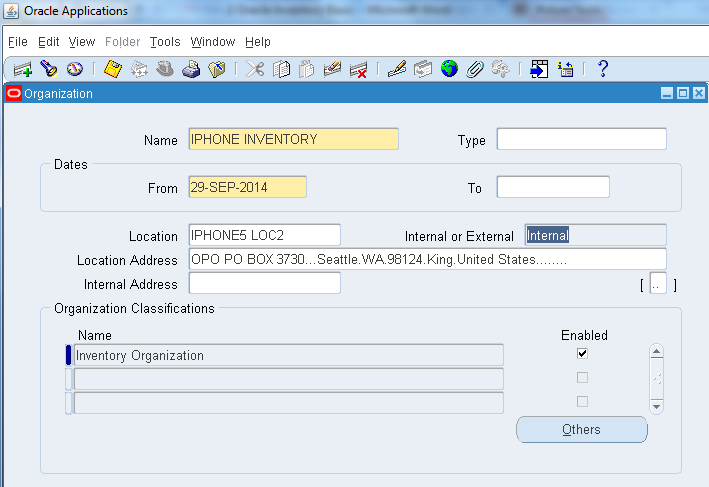
  • Select the location we have created before for the inventory and we have Named Inventory as : IPHONE INVENTORY

  • Click on others:

  • Here mention the operating unit for the inventory we have created.
  • After saving, Click on others button again, Click on Inventory information as below.
  • Atatch the IPHONE MASTER ORG in the Item Master Org.
  • change the charge line of the account if needed.


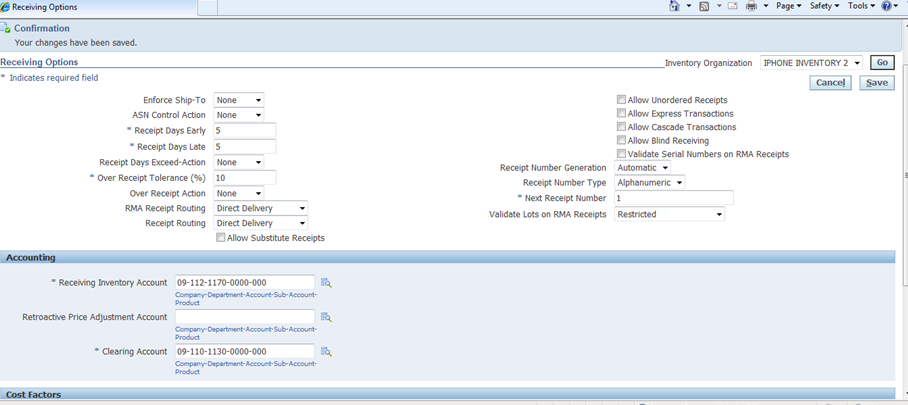
              Now click on Inventory-Reciveing information, will take you to the web page as below.
  • Fill all the mandatory (*) blanks as below.
  • Give the account number with the Legal Entity created before(09)

Save the above dialog box

If you like to create another inventory you can follow the above steps or else you can even copy the inventory organainzation to create a new as below.
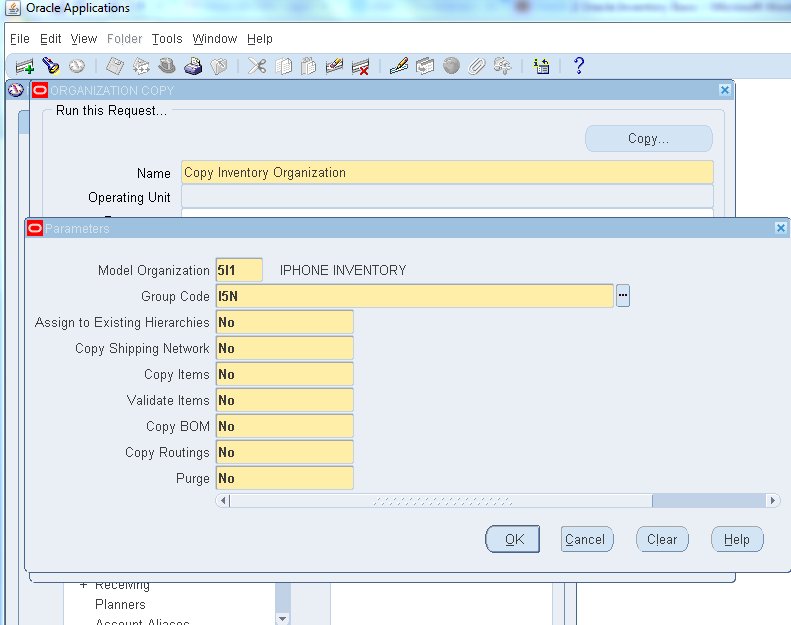
Invoking: Inventory→Setup→Organizations→Organization Copy→Maintain Interface
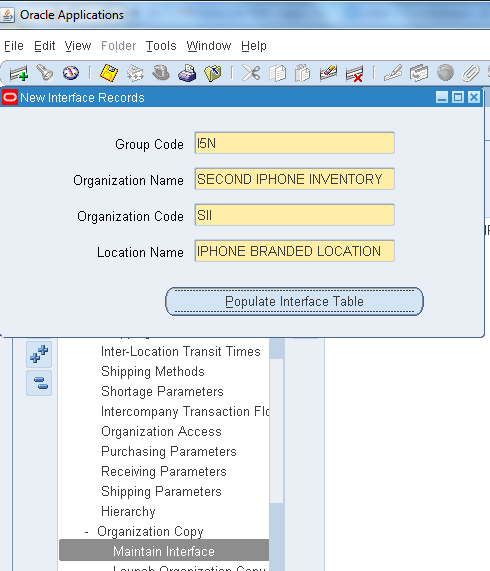
  • Now select Inventory→Setup→Organizations→Organization Copy→Launch Organization Copy
  • Provide the Model Organization (Source) & Group Code (Just created) so that all the details of Model Organization is copied to the new one.
  • Click on submit to run the concurrent program, which will create new inventory.


Hence we have completed creating
  • Master Org
  • IPHONE Inventory 1
  • SECOND IPHONE Inventory

STEP: 5 Creating Sub Inventories & Locators
  • Lets create Subinventory for respective Inventories.
  • Select Change Organization from inventory responsibility
It will list all the inventories created, let’s select IPHONE Inventory, so that we can create sub inventory, stock locators in this inventory.
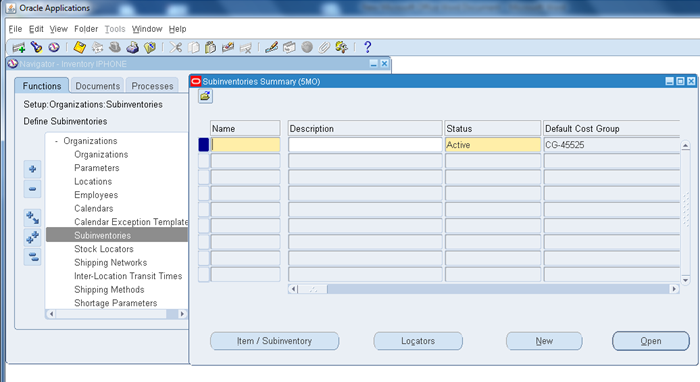
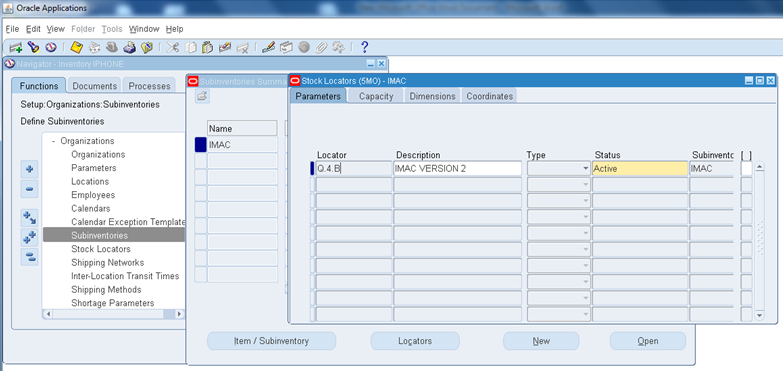
Invoking:  Setup→Organization→Sub inventories.
Select new, create a Sub inventory of our choice.
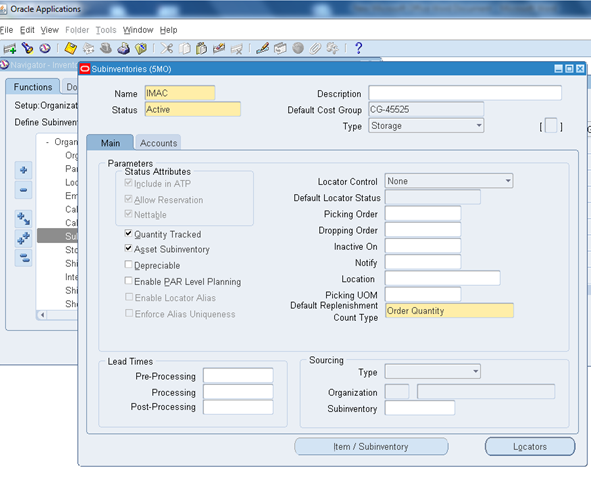
  • Here we are creating sub inventory as IMAC
  • Make sure in Main tab, Quantity tracked & Asset Sub Inventory checked as below.
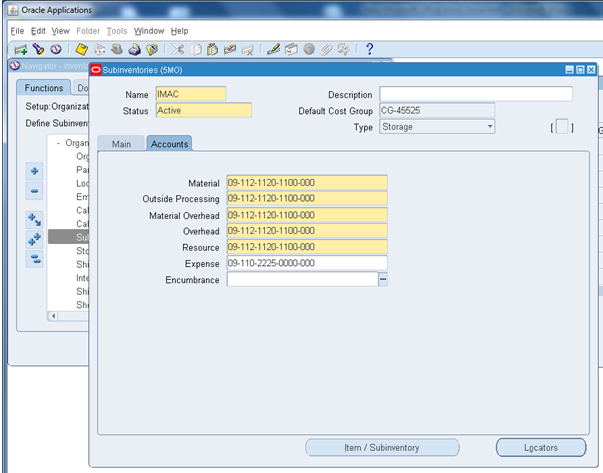
  • In Account Tab select Account (09) depending upon charted accounts.
 
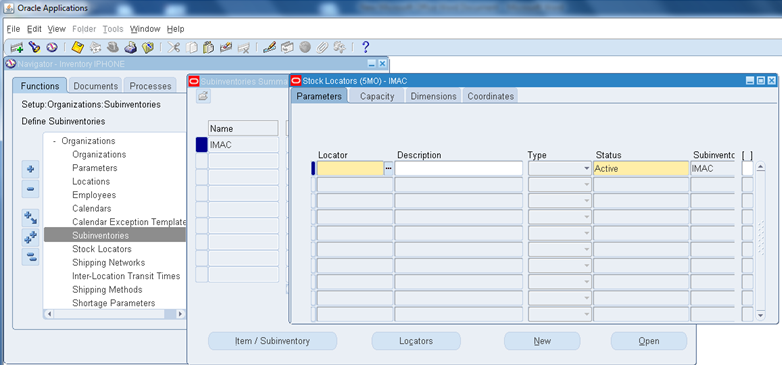
  • Save the above screen and select on locators
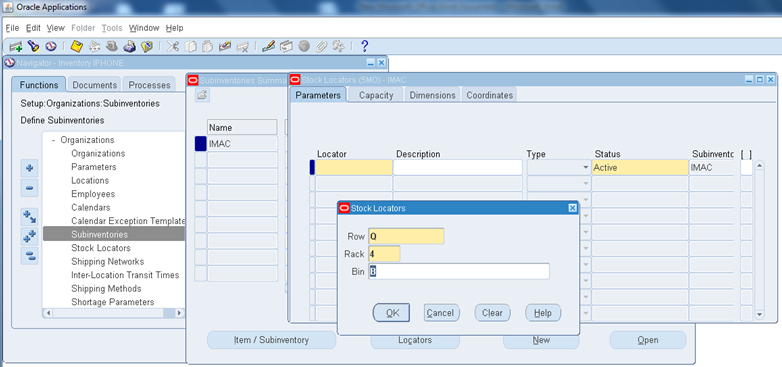
  • Select the locators and fill the fields as ROW Q, RACK 4, BIN B as below of your choice.
  • Save and close the form which completes the sub inventory and stock locators basic.
  • Similarly we can create “n” number of sub inventories respectively.
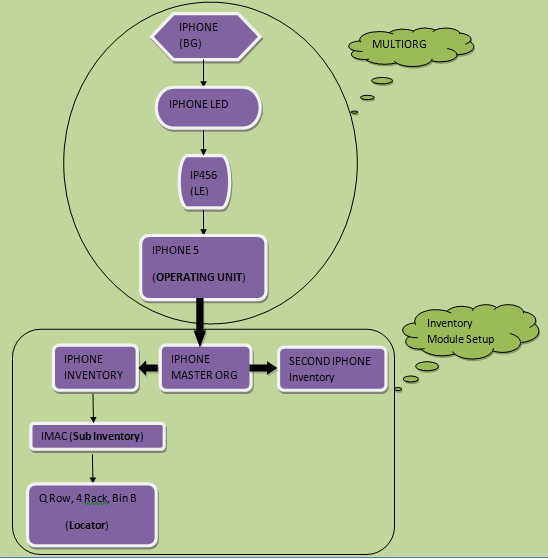
Below is the flowchart of the setup we created for better understanding.
  • Now after completing all the above, switch the responsibility to system administrator.
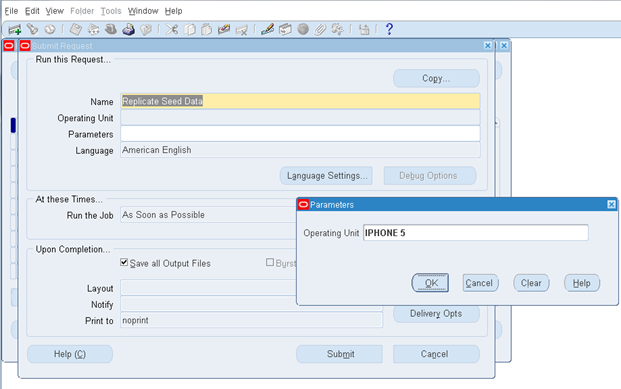
  • Click on View→Request→Submit a New Request-Single Request→OK
  • Run :Replicate seed data as below.

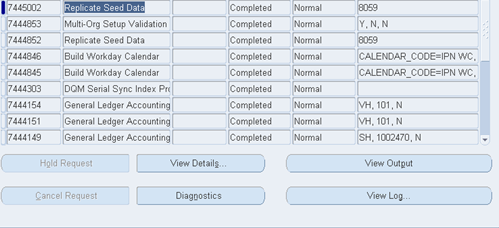
Check the status View→Request


  • Which completes all essential setups for the Inventory Organization.
  • Incase you have not created any Operating Unit or General Ledger, as an optional step, you can query the organization ‘Vision Operations’ and check that it is classified as both a Legal Entity and Operating Unit as well as an Inventory Organization. If you check the Inventory Organization Parameters for ‘Vision Operations’ you will notice that the organization code is defined as ‘V1′. The master org is itself.
Conclusion:
  • You must plan how Oracle Inventory represents your company's inventory sites and business units. This includes defining organizations, locations, subinventories, and locators.
  • This completes Inventory Org Basic Setup In Oracle EBS R12.

Oracle Fusion - Cost Lines and Expenditure Item link in Projects

SELECT   ccd.transaction_id,ex.expenditure_item_id,cacat.serial_number FROM fusion.CST_INV_TRANSACTIONS cit,   fusion.cst_cost_distribution_...