1 Overview of Oracle Alerts
2 Defining Alerts
3 Type of Alerts
4 Check the Alerts
Overview of Oracle Alerts:
· Keep you informed of critical activity in your database
· Deliver key information from your applications, in the format you choose
· Provide you with regular reports on your database information
· Automate system maintenance, and routine online tasks
Overview:
Oracle Alert is your complete exception control solution.
Oracle Alert facilitates the flow of information within your organization by letting you create entities called alerts to monitor your business information and to notify you of the information you want. You can define one of two types of alerts: an event alert or a periodic alert.
An event alert immediately notifies you of activity in your database as it occurs. When you create an event alert, you specify the following:
· A database event that you want to monitor, that is, an insert and/or an update to a specific database table.
· A SQL Select statement that retrieves specific database information as a result of the database event.
· Actions that you want Oracle Alert to perform as a result of the database event. An action can entail sending someone an electronic mail message, running a concurrent program, running an operating script, or running a SQL statement script. You include all the actions you want Oracle Alert to perform, in an action set.
A periodic alert, on the other hand, checks the database for information according to a schedule you define. When you create a periodic alert, you specify the following:
· A SQL Select statement that retrieves specific database information.
· The frequency that you want the periodic alert to run the SQL statement.
· Actions that you want Oracle Alert to perform once it runs the SQL statement. An action can entail sending the retrieved information to someone in an electronic mail message, running a concurrent program, running an operating script, or running a
· SQL statement script.
Defining Alerts:
Navigator: Alert Vision Manager USA
To define Alerts

Types of Alerts:
1. Periodic Alerts
Periodic alerts periodically report key information according to a schedule you define.
To define a periodic alert:
1. Navigate to the Alerts form.
2. Enter the name of the application that owns the alert in the
Application field. This application must reside in the same Oracle database as Oracle Alert.
3. Name the alert (up to 50 characters), and give it a meaningful description (up to 240 characters).
4.Enter a name for the alert that is unique within the application. Use an initial character other than a pound sign (#), a colon (:), or a percentage sign (%).
1. Select a frequency for your periodic alert. You can choose from nine frequency options:
2.
Frequency :
On Demand :-We have to run the alert to fire.
Enter which Application u want to specify alerts, name of the alert,
Click whether its periodic or Event
On Day of Month: It will fire last day of every month.
It will start from 12 AM up to 11 AM morning and each 2 hours interval the alert will fire once.
Exa: 12AM, 2 AM, 4 AM … … … … 8am, 10am.
 On Day of Week :
 Same as On day of Month.
Every N Calendar day: It will fire in each two days.
Every N Business Day: It will fire once in each three business day.(It will not count the holidays)
Every Day: It will fire daily
Every Other Day : It will fire in a alternative day.
Every Business Day: It will fire every day except holiday.
Every Other Business Day: It will fire in an alternative business (working) day.
i.e It will not consider holidays
Import : We can import the files(which contain the query) if the query size is big, if it exceed the memory.


After writing the Query in
Select Statement area click on
Verify to verify the query and

After Click on
Verify Button the following message will come.
Click on OK and Save
Then click on
Run to execute the query.
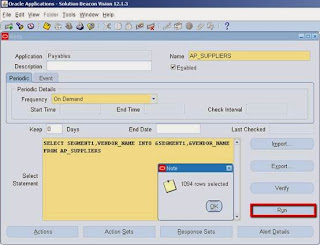
Click on
Run button , the following screen will come. And click on OK.
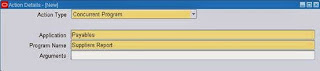
2 . Click on
Actions Button and enter the Action information like following screen
Details Action perform once for each exception found,
Summary Action perform once for all exception found
No exception performs when no exception was found.
2.click on
Action Details and enter the value and save.
Concurrent Program : Used to execute the Concurrent program.
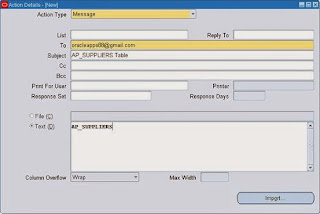
 Message :
 Used to send the message via mail.
 Operating System Script:
 Used to run the OS Script.
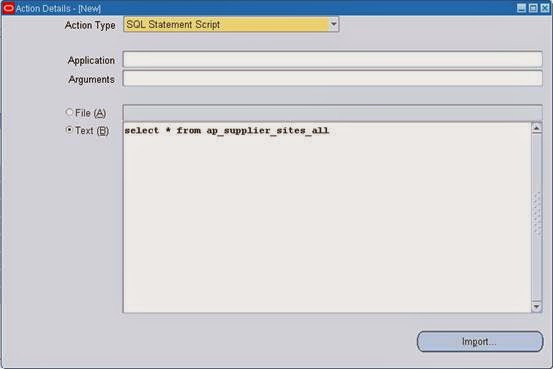
 SQL Statement Script :
 Used to run the SQL statement Script.
3. Click on
Action Sets button from Alert window
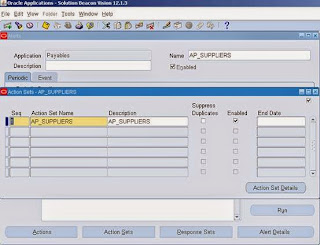
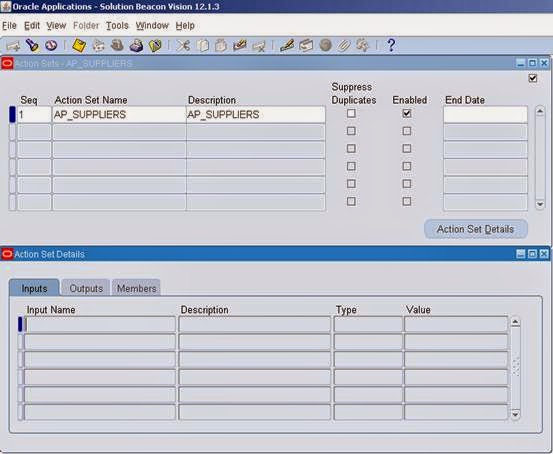
Then click on
Action Set Details
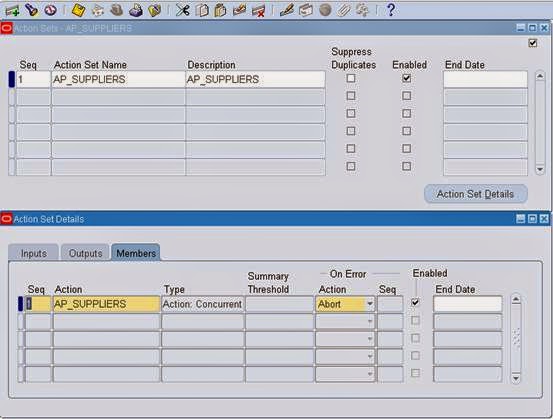
4. Then click on
Alert Details from the Alert window and enter the value and save.
Event Alerts:
Creating an Event Alert
To create an event alert, you perform the following tasks in the order listed:
• Define the database events that will trigger your alert
• Specify the details for your alert
• Define actions for your alert
• Create action sets containing the actions you want your alert to perform
This section focuses on the first task of defining the database events that trigger your event alert and divides the task into smaller sub–tasks.
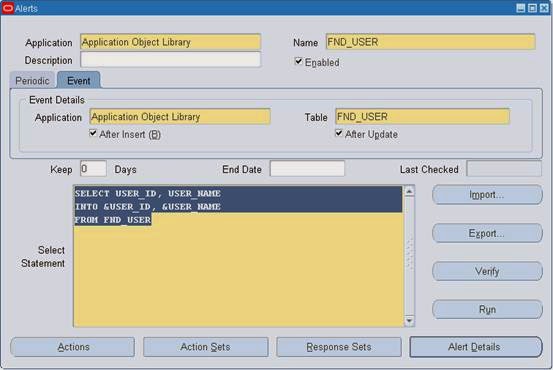
To define an event alert:
1. Navigate to the Alerts form.
2. In the Application field, use the list of values to choose the name of the application that owns the alert. This application must reside in the same Oracle database as Oracle Alert.
3. Name the alert (up to 50 characters), and give it a meaningful description (up to 240 characters).
Enter a name for the alert that is unique within the application. Use an initial character other than a pound sign (#), a colon (:), or a percentage sign (%).
4. In the Type field, choose Event.
5. Check Enabled to enable your event alert.
 To specify the alert details for an event or periodic alert:
1. With your alert definition displayed in the Alerts form, choose Alert Details. The Alert Details window that appears contains three tabbed regions: Installations, Inputs, and Outputs.
2. In the Inputs tabbed region, Oracle Alert automatically displays the inputs used in your Select statement, unless they are the implicit
inputs: :ROWID, :MAILID, :ORG_ID and :DATE_LAST_CHECKED.
The values of the implicit inputs are as follows:
•
ROWID—Contains the ID number of the row where the insert or update that triggers an event alert occurs.
•
MAILID—Contains the email username of the person who enters an insert or update that triggers an event alert.
•
ORG_ID—Contains the organization ID that is selected when the alert runs.
•
DATE_LAST_CHECKED—Contains the date and time that the alert was most recently checked.
3. You can optionally add a description for each input, but you must specify the data type (either character, number, or date) for the input, because Oracle Alert uses the data type to validate the default values for inputs you enter in the Default Values field and in the Action Set Inputs tabbed region of the Action Sets block.
4. Enter a default value for your input. You can enter up to 240 characters. This value automatically becomes the default value for your input in each action set you define.
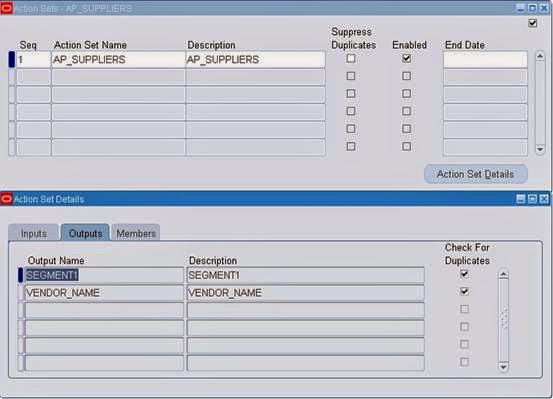
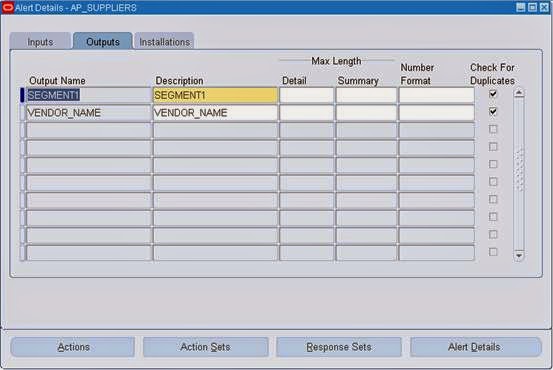
5. In the Outputs tabbed region, Oracle Alert automatically displays the outputs used in your alert Select statement without the ampersand (&) and any numbering format. You can add meaningful descriptions for the outputs.
6. You can specify the maximum number of output characters you want to display in your detail or summary message actions. See: Formatting Summary Message Actions:
7. If your output value is numeric, enter the SQL*Plus format mask in the Number Format field.
8. You can also check the Check for Duplicates check box to customize the combination of outputs you want to verify as a possible duplicate exception each time the alert is checked. A duplicate exception is an exception that existed in your database during previous alert checks. You can define Oracle Alert to perform certain actions based on the presence of these duplicate exceptions.
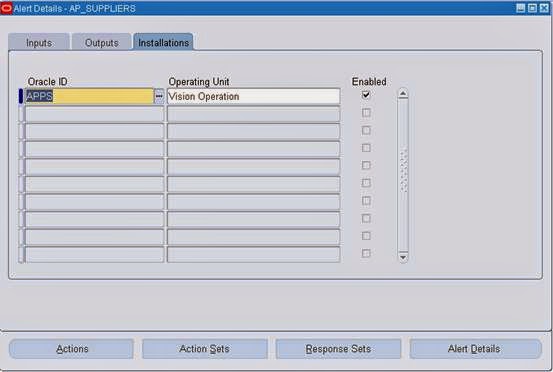
9. In the Installations tabbed region, specify an Oracle ID if you want Oracle Alert to check your alert against that specific Oracle ID. You can select only those Oracle IDs that are associated with the application that owns your alert.
If you do not specify an Oracle ID in this region, Oracle Alert checks your alert against all installations in your database of the application that owns your alert.
10. If you have multiple organizations defined in your Oracle Applications schema, you must specify the organization you want the alert to run against in the Operating Unit field.
Click Action details,
In Action details Navigator
They are four types of Actions
Concurrent Program : Used to execute the Concurrent program.
Message : Used to send the message via mail.
Operating System Script: Used to run the OS Script.
SQL Statement Script : Used to run the SQL statement Script.
Check the Alert:
1. Go to Alert Manager
(N) Request>Check
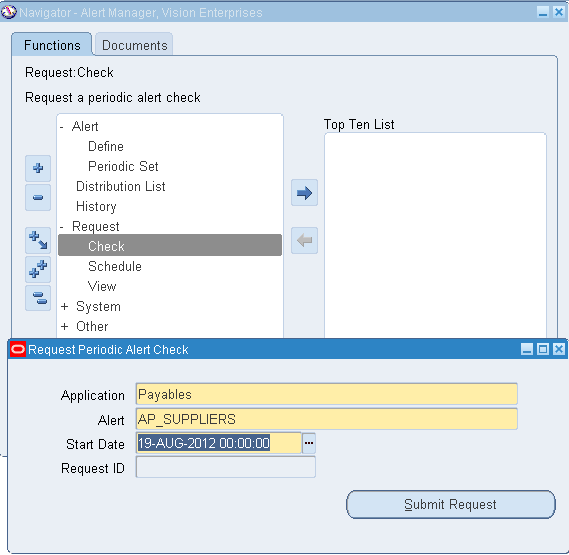
Then View> Request >Find from Alert Manager responsibility.
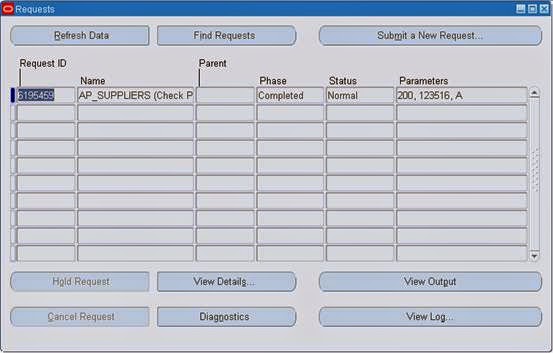
After completed Normal check the mail.
Query to Find Out Oracle Alerts
The following query finds all enabled custom alerts. You can comment out the very last two lines (alr.enabled_flag and alr.created_by) to display all both enabled and disabled alerts.
-------------------------------------------------------------------------------
-- Query to find Custom Oracle Alert
-------------------------------------------------------------------------------
SELECT alr.application_id,
alr.alert_id,
alr.alert_name,
alr.start_date_active,
alr.description,
alr.sql_statement_text
FROM alr.alr_alerts alr
WHERE 1=1
AND alr.created_by <> 1
-- show only custom alerts
AND alr.enabled_flag = 'Y';
-- show only enabled alerts
Oracle Apps Alerts Tables:
| Oracle Apps Alerts Table |
| ALR_ACTION_DATA |
| ALR_ACTION_GROUP_MEMBERS |
| ALR_ACTION_GROUPS |
| ALR_ACTION_HISTORY |
| ALR_ACTION_OUTPUTS |
| ALR_ACTION_SET_CHECKS |
| ALR_ACTION_SET_INPUTS |
| ALR_ACTION_SET_MEMBERS |
| ALR_ACTION_SET_OUTPUTS |
| ALR_ACTION_SETS |
| ALR_ACTIONS |
| ALR_ACTUAL_RESPONSES |
| ALR_ALERT_CHECKS |
| ALR_ALERT_INPUTS |
| ALR_ALERT_INSTALLATIONS |
| ALR_ALERT_OUTPUTS |
| ALR_ALERTS |
| ALR_ALERTS_A |
| ALR_DISTRIBUTION_LISTS |
| ALR_LOOKUPS |
| ALR_MESSAGE_SYSTEMS |
| ALR_ORACLE_MAIL_ACCOUNTS |
| ALR_OUTPUT_HISTORY |
| ALR_PERIODIC_SET_MEMBERS |
| ALR_PERIODIC_SETS |
| ALR_PROFILE_OPTIONS |
| ALR_RESPONSE_ACTION_HISTORY |
| ALR_RESPONSE_ACTIONS |
| ALR_RESPONSE_MESSAGES |
| ALR_RESPONSE_SETS |
| ALR_RESPONSE_VARIABLE_VALUES |
| ALR_RESPONSE_VARIABLES |
| ALR_VALID_RESPONSES |


